751.11 Bearings: Difference between revisions
| (26 intermediate revisions by 2 users not shown) | |||
| Line 93: | Line 93: | ||
The sole plates are flat or beveled to match the profile grade of the roadway surface along the centerline of the girder. If the profile grade is equal to or less than 0.01 or the total drop across the bearing is equal to or less than 1/8 inch, then a flat sole plate may be used and if necessary, elastomer thickness increased to address the bearing rotation due to the profile grade. Sole plates are used to anchor girders, ensure uniform distribution of the compressive stress and strain over bearing area and reduce dead load bearing rotations. | The sole plates are flat or beveled to match the profile grade of the roadway surface along the centerline of the girder. If the profile grade is equal to or less than 0.01 or the total drop across the bearing is equal to or less than 1/8 inch, then a flat sole plate may be used and if necessary, elastomer thickness increased to address the bearing rotation due to the profile grade. Sole plates are used to anchor girders, ensure uniform distribution of the compressive stress and strain over bearing area and reduce dead load bearing rotations. | ||
At fixed bearings, [[ | At fixed bearings, [[#751.11.3.6 Girder/Beam Chairs|girder chairs]] may be considered as an alternate if roadway slope, rotation or bearing pressure is requiring tall or large bearing pads. | ||
The elastomer bearing pad shall be 60 durometer hardness and reinforced with 1/8 inch steel shim plates when laminated pads are required by design. | The elastomer bearing pad shall be 60 durometer hardness and reinforced with 1/8 inch steel shim plates when laminated pads are required by design. | ||
When rectangular bearings are used, increased rotation bearing capacity can be achieved by orientating the pad with the shorter dimension of the pad parallel with the span of the girder. | When rectangular bearings are used, increased rotation bearing capacity can be achieved by orientating the pad with the shorter dimension of the pad parallel with the span of the girder. | ||
<div id="Plain elastomeric bearing pads"></div> | |||
Plain elastomeric bearing pads should be utilized where vertical loads, translations and rotations are relatively small. For integral end bents, use ½” fixed plain pads when taper due to girder slope or grade is less than 1/8”, or use a laminated bearing pad when taper equals or exceeds 1/8” due to girder slope or grade. | Plain elastomeric bearing pads should be utilized where vertical loads, translations and rotations are relatively small. For integral end bents, use ½” fixed plain pads when taper due to girder slope or grade is less than 1/8”, or use a laminated bearing pad when taper equals or exceeds 1/8” due to girder slope or grade. In the rare circumstance when intermediate bents are made integral by extending the beam cap stirrups into the diaphragm, consideration can be given to utilizing ½” plain pads under similar conditions of slope. | ||
Laminated elastomeric bearing pads should be utilized where there is greater need for vertical loading, translational and rotational capacity. For non-integral end bents, non-integral intermediate bents and for integral end bents when taper exceeds 1/8” due to girder slope or grade use laminated elastomeric bearing pads where the pad thickness and number of laminates is based on design that should account for larger vertical loads, translation, rotation and meet slope of girder and grade requirements. | Laminated elastomeric bearing pads should be utilized where there is greater need for vertical loading, translational and rotational capacity. For non-integral end bents, non-integral intermediate bents and for integral end bents when taper exceeds 1/8” due to girder slope or grade use laminated elastomeric bearing pads where the pad thickness and number of laminates is based on design that should account for larger vertical loads, translation, rotation and meet slope of girder and grade requirements. | ||
| Line 320: | Line 320: | ||
There is a code check for compressive deflection of a single layer but no code check for total compressive deflection. | There is a code check for compressive deflection of a single layer but no code check for total compressive deflection. | ||
<div id="Taper"></div> | |||
'''Taper''' | '''Taper''' | ||
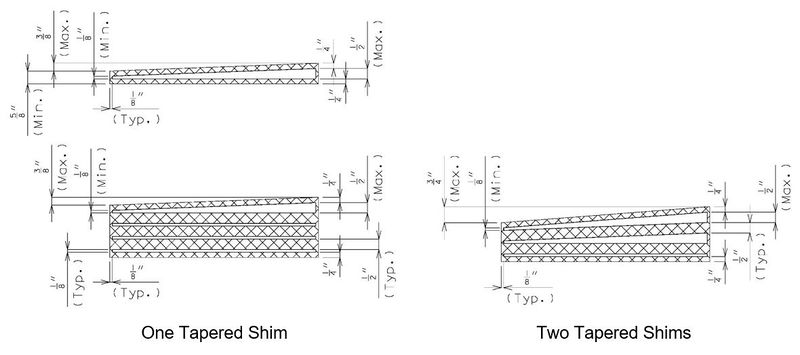
When the difference between the slope of the girder and the slope of a bearing pad exceeds 1/8” taper shall be considered. For laminated expansion pads for both PS I-Girders and steel girders and for laminated fixed pads for steel girders where sole plates are required, sole plates shall be tapered to account for the girder slope. Sole plates shall have a minimum thickness of 1 1/2” at the centerline of bearing, and a minimum thickness of 1” at the edge. Plain fixed pads shall not be tapered. At integral end bents where girder slope is greater than 1/8”, use laminated fixed pads. Laminated bearing taper is provided by tapering the top shim to match the slope of the girder to the nearest 1/8” total difference in thickness. Thickness of shims shall be a minimum of 1/8” and a maximum of 1/2”. For excessive girder slopes it may be necessary to taper the top two shims. Tapered layers of elastomer are not permitted. | When the difference between the slope of the girder and the slope of a bearing pad exceeds 1/8” taper shall be considered. For laminated expansion pads for both PS I-Girders and steel girders and for laminated fixed pads for steel girders where sole plates are required, sole plates shall be tapered to account for the girder slope. Sole plates shall have a minimum thickness of 1 1/2” at the centerline of bearing, and a minimum thickness of 1” at the edge. Plain fixed pads shall not be tapered. At integral end bents where girder slope is greater than 1/8”, use laminated fixed pads. Laminated bearing taper is provided by tapering the top shim to match the slope of the girder to the nearest 1/8” total difference in thickness. Thickness of shims shall be a minimum of 1/8” and a maximum of 1/2”. For excessive girder slopes it may be necessary to taper the top two shims with a maximum combined taper of the bearing of 3/4 inch. Tapered layers of elastomer are not permitted. | ||
[[Image:751.11.2.1 taper.jpg|center|800px]] | |||
<div id="Anchor Bolts"></div> | |||
'''Anchor Bolts''' | '''Anchor Bolts''' | ||
Check with Structural Project Manager or Liaison before using anchor bolts other than ASTM F1554 | Check with Structural Project Manager or Liaison before using anchor bolts other than ASTM F1554. When anchor bolts are used for laminated fixed for steel girders or laminated expansion for steel and P/S I-girders, they should be designed for a minimum horizontal force equal to 25% of the maximum dead load applied to the bearing. With SPM approval for rehab superstructure job designer may design anchor bolt for a minimum horizontal force equal to 15% of the maximum dead load applied to the bearing. Designer may ignore live load in horizontal force computation. Anchor bolts shall be ASTM F1554 Grade 55 unless higher grade anchor bolts are required to meet design requirements. Grade 105 bolts shall not be used in applications where welding to the bolt is required. (Revise anchor bolt notes in [[751.50 Standard Detailing Notes|EPG 751.50 Standard Detailing Notes]] for plans with different grade and nuts, e.g. “ASTM F1554 Grade 55” to “ASTM F1554 Grade 105” and “ASTM A563 Grade A Heavy Hex nuts” to “ASTM A563 Grade DH Heavy Hex nuts”.) | ||
<center> | |||
{|border="1" cellpadding="5" cellspacing="1" align="center" style="text-align:center;" | {|border="1" cellpadding="5" cellspacing="1" align="center" style="text-align:center;" | ||
!colspan="11"| | !colspan="11"|Bolt properties (Updated in 2022) | ||
|- | |- | ||
| | !width="225"|Bolt Type!!width="150"| Nominal Bolt<br/>Diameter (in.)!!width="125"| Min. Tensile<br/>Strength (ksi)!!width="125"| Min. Yield <br/>Strength (ksi)!!width="250"| Comments | ||
|- | |- | ||
| | |ASTM F1554 (Grade 36)|| ½” to 4”|| 58|| 36||rowspan="3"| Preferred specification for structural supports anchored into concrete. | ||
|- | |- | ||
| | |ASTM F1554 (Grade 55)|| ½” to 4”|| 75|| 55 | ||
|- | |- | ||
| | |ASTM F1554 (Grade 105)|| ½” to 3”|| 125|| 105 | ||
|- | |- | ||
|1 | |rowspan="3"|ASTM A449<br/>Type 1<br/>Type 3 (weathering)||¼” to 1”||120||92||Rowspan="2"|Material properties are applicable for old A325 bolts (Pre-2016). May be manufactured as a threaded rod. | ||
|- | |- | ||
|1 | | over 1” to 1 ½” ||105|| 81 | ||
|- | |- | ||
| | | 1 ¾” to 3”|| 90|| 58||Typically used for larger diameter headed anchors for bearings in girder shelves. | ||
|- | |- | ||
| | |ASTM A307|| ¼” to 4”|| 60|| NA||Typically used for regular strength steel connections. Should not be used for applications that require significant tensile or flexural forces on the bolt. | ||
|- | |- | ||
|3 | |ASTM F3125 Grade A325<br/>Type 1<br/>Type 3 (weathering)|| ½” to 1 ½”||120|| 92|| Typically used as high strength fasteners, but also used as headed anchors for bearings in girder shelves. | ||
|- | |- | ||
| | |ASTM F3125 Grade A490<br/>Type 1<br/>Type 3 (weathering)|| ½” to 1 ½”|| 150|| 130|| Typically used as high-strength fastener. Galvanization is not allowed. | ||
|- | |||
|colspan="5" align="left"|Note: The above table is a comprehensive list for bolts typically used in structural applications on MoDOT projects. These values will aid designers when substitutions need to be made for similar design applications. | |||
|} | |||
</center> | |||
Anchor bolts are used on bearings with sole plates. For bridges that require seismic details only, design anchor bolts for flexure and shear induced from horizontal seismic forces and design for tension due to uplift forces if present. For bridges that require a seismic analysis, design anchor bolts for flexure induced from horizontal seismic forces and separately design for the effects of combined tension and shear. | |||
Limit the number of bolts per bearing to four. Concrete Shear blocks shall be used when anchor bolts cannot be designed to resist earthquake loading. For shear blocks details for P/S girder see, [[751.22 Prestressed Concrete I Girders#751.22.3.13 Concrete Shear Blocks|EPG 751.22.3.13 Concrete Shear Blocks]]. Use similar details for shear blocks for steel girder. | |||
Bearing details are shown in [[751.11 Bearings#751.11.3 Details|EPG 751.11.3 Details]] for two 1 ½”, 2” and 2 ½“ diameter anchor bolts. Consult Structural Project Manager before using bolt diameters larger than 2 1/2". Revise bearing details if four anchor bolts are required by design. For larger than 2 ½” diameter anchor bolt revise details in [[751.11 Bearings#751.11.3.5 Anchor Bolts|EPG 751.11.3.5 Anchor Bolts]], bearing details and anchor bolt notes in [[751.50 Standard Detailing Notes|EPG 751.50 Standard Detailing Notes]]. | |||
'''For seismic details only (strength limit states)''' | |||
Anchorage shall be adequate to resist lateral loads. | |||
Horizontal factored shear force, <math>{F_H} = \sqrt{(F_T)^2 + (F_L)^2}</math> in kips per girder | |||
For expansion bearings, transverse F<sub>T</sub> = 0.25(DL) per girder & longitudinal F<sub>L</sub> = 0. | |||
Use shear | Where DL = unfactored dead load reaction at the bent, kips | ||
For fixed bearings, transverse F<sub>T</sub> = 0.25(DL) per girder and Longitudinal F<sub>L</sub> = (0.25)(segment weight)/(# of girders) | |||
Segment weight includes the full width of superstructure and should be distributed appropriately among fixed bents. | |||
When centrifugal forces are present, they should be checked independently (not combined with seismic loads shown above or below). Use a 1.75 load factor with the centrifugal force and check resistance at the Strength Limit state as described below. | |||
'''For complete seismic analysis ''' | |||
Anchor bolt designs must meet requirements for strength limit states from above as well as seismic forces from seismic analysis. Anchorage shall be adequate to resist lateral loads as well as uplift force from seismic analysis. | |||
''At Intermediate bent, '' | |||
:<math>{F_H} = \frac{\sqrt{\sum{V_L}^2 + \sum{V_T}^2}}{{N_G}}</math> | |||
where: | |||
F<sub>H</sub> = horizontal seismic force per girder, kips | |||
::If columns are designed for plastic hinging, use the plastic hinging shear. | |||
<math>\sum{V_L}</math> = summation of top of column longitudinal shears at the bent | |||
<math>\sum{V_T}</math> = summation of top of column transverse shears at the bent | |||
N<sub>G</sub> = number of girders at the bent | |||
''At end bents '' | |||
Use the same formula as above, except substitute the abutment shears in place of the top of column shears. | |||
:<math>{P_u} = \frac{F_H}{{n_b}R}</math> | |||
P<sub>u</sub> = horizontal factored shear force per bolt, kips | |||
n<sub>b</sub> = the number of bolts per girder | |||
For intermediate bent, R = 1.0 | |||
For end bent, R = 1.0 for seismic category A & B and 0.8 for seismic category C & D. | |||
'''Flexural Resistance ''' | |||
Factored flexural stress shall be less than or equal to the nominal flexural resistance. Assume the bolt is restrained from rotation by the sole plate, but free to translate. | |||
M = P<sub>u</sub> x L/2 = maximum moment per bolt, inch-kips | |||
L = moment arm from center of sole plate to top of the beam cap, inches | |||
S = section modulus for the bolt <math>=\frac{\pi D^3}{32}</math>, cubic inches. | |||
D = minimum body diameter, inches. For F1554 bolts use D = 0.92 x nominal bolt diameter. Alternately, the minimum body diameter can be retrieved from ASTM F1554 Table 4. For all other bolt types the nominal bolt diameter may be used because the bolt is unthreaded in the flexural zone and the minimum body diameter is similar to the nominal diameter. | |||
:<math>{f_b} = \frac{M}{S} \le {\empty_f}{F_Y}</math> | |||
Where: | |||
∅<sub>f</sub> = 1.0 resistance factor for seismic details only (strength limit states) and for complete seismic analysis | |||
Yield strength of the anchor bolt, F<sub>Y</sub> = 55 ksi for Grade 55 and F<sub>Y</sub> = 105 ksi for Grade 105 | |||
'''Shear Resistance''' | |||
Factored shear force shall be less than or equal to the nominal shear resistance. | |||
:<math>{P_u} \le {\empty_s}{R_n}</math> | |||
where: | |||
∅<sub>s</sub> = 0.75 resistance for seismic details only (strength limit states) and 1.0 for complete seismic analysis | |||
Nominal shear resistance of an F1554 anchor bolt, R<sub>n</sub> = 0.5A<sub>b</sub>F<sub>ub</sub>N<sub>s</sub> LRFD 6.13.2.12-1, C6.13.2.7 and 14.8.3 | |||
Note: ASTM F1554 allows the body diameter of the bolt to be reduced to provide an area not less than the stress area of the threaded portion of the bolt. For this reason, there are no differences in calculation for threads beings included or excluded from the shear plane. If another type of bolt is used for any reason the nominal shear resistance should be determined from LRFD Eq. 6.13.2.7-1 or 2. | |||
A<sub>b</sub> <math>= \frac{\pi D^2}{4}</math> = nominal area of the anchor bolt, square inches | |||
F<sub>ub</sub> = minimum tensile strength of the anchor bolt, ksi | |||
: = 75 ksi for Grade 55, 125 ksi for Grade 105 | |||
N<sub>s</sub> = number of shear plane per anchor bolt = 1 | |||
D = nominal bolt diameter, inches | |||
'''Tensile Resistance''' | |||
Factored tensile force shall be less than or equal to the nominal tensile resistance. | |||
T = the maximum seismic tensile (uplift) force (DL ± EQ) per girder from the seismic analysis, kips. If (DL+EQ) and (DL-EQ) are both compressive, then there is no need to design the bolts for tensile force. | |||
:<math>\frac{T}{{n_b}} \le {\empty_t}{T_n}</math> | |||
Where: | |||
∅<sub>t</sub> = 0.8 resistance factor for seismic details only (strength limit states) and 1.0 for complete seismic analysis | |||
n<sub>b</sub> = the number of bolts per girder | |||
Nominal tensile resistance of the anchor bolt, T<sub>n</sub> = 0.76A<sub>b</sub>F<sub>ub</sub> LRFD 6.13.2.10.2-1 and 14.8.3 | |||
:where: | |||
:A<sub>b</sub> = nominal area of the anchor bolt, square inches | |||
:F<sub>ub</sub> = minimum tensile strength of the anchor bolt, ksi | |||
:: = 75 ksi for Grade 55, 125 ksi for Grade 105 | |||
'''Combined Tension and Shear Resistance''' | |||
The resistance of anchor bolts for combined tension and shear force shall be determined in accordance with LRFD 6.13.2.11. | |||
If <math>\frac{P_u}{R_n} \le 0.33</math>, then T<sub>n</sub> = 0.76A<sub>b</sub>F<sub>ub</sub> LRFD 6.13.2.11-1 | |||
Otherwise | |||
:<math>{T_n} = 0.76{A_b}{F_{ub}} \Big[ 1 - \big( \frac{{p_u}}{{\empty_s}{R_n}} \big)^2 \Big]^{0.5}</math> LRFD 6.13.2.11-2 | |||
'''Strength Limit States and Seismic Details only''' | |||
Maximum horizontal factored shear force reaction, F<sub>H</sub> for given anchor bolts and total thickness of bearing including steel shims: | |||
<center> | |||
{|border="1" cellpadding="5" cellspacing="1" align="center" style="text-align:center;" | |||
! !! colspan="2"|Max. shear deformation of the pad, ∆s, in.!!1/4!! 1/2!! 3/4!! 1!! 1 1/4!! 1 1/2!! 1 3/4!! 2!! 2 1/4 | |||
|- | |||
! !! colspan="2"|Total thick. of bearing including steel shims, C in.!! 1 1/4!! 1 7/8!! 2 1/2!! 3 1/8!! 3 3/4!! 4 3/8!! 5!! 5 5/8!! 6 1/4 | |||
|- | |||
!Anchor Bolt Type!! No. of Anchor<br/>Bolt!! Nominal dia. of anchor bolt, in.!!colspan="9"| Maximum horizontal factored shear force reaction, F<sub>H</sub> | |||
|- | |||
|rowspan="6"|ASTM F1554<br/>Grade 55||rowspan="3"|2|| 1.5|| 28|| 22|| 17|| 15|| 13|| 11|| 10|| 9|| 8 | |||
|- | |||
| 2|| 67 ||51|| 41|| 35|| 30|| 26|| 23|| 21|| 19 | |||
|- | |||
| 2.5|| 131|| 100|| 81|| 68|| 58|| 51|| 46|| 41|| 38 | |||
|- | |||
|rowspan="3"|4|| 1.5|| 57|| 43|| 35|| 29|| 25|| 22|| 20|| 18|| 16 | |||
|- | |||
| 2|| 135|| 103|| 83|| 69|| 60|| 53|| 47|| 42|| 38 | |||
|- | |||
| 2.5|| 263|| 200|| 162|| 136|| 117|| 103|| 91|| 82|| 75 | |||
|- | |||
|rowspan="6"|ASTM F1554<br/>Grade 105||rowspan="3"|2 ||1.5 ||54 ||41 ||33 ||28 ||24 ||21 ||19 ||17 ||15 | |||
|- | |||
| 2 ||128 ||98 ||79 ||66 ||57 ||50 ||45 ||40 ||37 | |||
|- | |||
| 2.5 ||251 ||191 ||154 ||129 ||111 ||98 ||87 ||79 ||72 | |||
|- | |||
|rowspan="3"|4 ||1.5 ||108 ||83 ||67 ||56 ||48 ||42 ||38 ||34 ||31 | |||
|- | |||
| 2 ||257 ||196 ||158 ||133 ||114 ||100 ||89 ||81 ||73 | |||
|- | |||
| 2.5 ||502 ||382 ||309 ||259 ||223 ||196 ||174 ||157 ||143 | |||
|- | |||
|valign="top"|'''Notes:'''||align="left" colspan="11"|Calculations were based on 1-1/2" thick sole plate at centerline of bearing.<br/>Flexural resistance calculations were based on minimum body diameter of the anchor bolt.<br/>For centrifugal forces, check anchor bolts for separate load.<br/>For complete seismic analysis case, design anchor bolts as explained above. | |||
|} | |||
</center> | |||
====751.11.2.2 Standard Pad Tables for P/S I-Girders==== | ====751.11.2.2 Standard Pad Tables for P/S I-Girders==== | ||
| Line 751: | Line 920: | ||
'''General''' | '''General''' | ||
PTFE bearings shall be used if Δ<sub>s</sub> > 2.5 in. | |||
PTFE sliding bearing shall consist of a lower unit and an upper unit as follows: | PTFE sliding bearing shall consist of a lower unit and an upper unit as follows: | ||
The lower unit shall be PTFE bonded to a 1/8” stainless steel plate which is vulcanized to a neoprene pad. | The lower unit shall be PTFE bonded to a 1/8” stainless steel plate which is vulcanized to a laminated neoprene pad. | ||
The upper unit shall be a 1/8” highly polished stainless steel plate welded to a steel sole plate. | The upper unit shall be a 1/8” highly polished stainless steel plate welded to a steel sole plate. | ||
70 Durometer hardness is to be used for sliding bearings. | 70 Durometer hardness and shear modulus G = 0.2 ksi is to be used for sliding bearings. | ||
Internal and external layers of elastomer shall be 0.5-inch and 0.25-inch thick, respectively. | |||
The laminated neoprene pad shall contain at least one internal layer of elastomer. Providing an internal layer ensures that Method A may be used for design in accordance with LRFD 14.7.6. | |||
The laminated neoprene elastomer pad shall meet the design requirements of 751.11.2.1, except shear deformation (i.e., deflection of bearing pad at first-slip) shall be checked as shown in the example below. | |||
'''PTFE Sliding Surface Design''' | |||
The following table represents the coefficients of friction for the design of PTFE sliding surfaces and are to be used instead of LRFD Table 14.7.2.5-1. | |||
{| class="wikitable" style="text-align: center;" | |||
{| | |+ Design Coefficients of Friction at Various Vertical Pressures | ||
| | ! rowspan=2 | PTFE Types !! colspan="5" | Coefficient of Friction, μ | ||
|- | |||
! 200 psi || 400 psi || 600 psi || 800 psi || 1000 psi | |||
|- | |||
| style="text-align: left" | Unfilled - Flat || 7% || 7% || 6% || 6% || 6% | |||
|- | |||
| style="text-align: left" | Filled - Flat || 20% || 16% || 13% || 10% || 8% | |||
|- | |||
| style="text-align: left" | Unfilled - Dimpled || 4% || 3% || 3% || 3% || 3% | |||
|- | |- | ||
| | | style="text-align: left" | Filled - Dimpled || 5% || 4% || 4% || 4% || 4% | ||
|} | |} | ||
Note:</br> | |||
Vertical pressure = DLmax/A, where A is the total PTFE surface area minus the dimpled area, if applicable.</br> | |||
Intermediate values may be determined by interpolation. Integer values shall be used for plans reporting.</br> | |||
Dimpled PTFE sliding surfaces are the preferred PTFE type. Flat PTFE may be used with SPM or SLE approval. The contractor is allowed to use unfilled or filled pads so the filled values should be used in design.</br> | |||
Dimpled PTFE surfaces are lubricated.</br> | |||
Filled PTFE surfaces incorporate glass fibers, carbon fibers, or other chemically inert filler. The primary reason behind the application of such blended fibers is to reduce creep, i.e., cold flow, and wear. | |||
'''PTFE Design Example – Filled -Dimpled''' | |||
PTFE dimensions are the same as the bearing pad dimensions. | |||
Service DLmax = 50 kips</br> | |||
Service LL = 73 kips</br> | |||
PTFE length, L = 11 in</br> | |||
PTFE width, W = 13 in</br> | |||
PTFE surface area, A = 143 - (30/100)143 = 100.1 in<sup>2</sup>, assume dimpled area is 30% of total PTFE surface area</br> | |||
Total elastomer thickness, h<sub>rt</sub> = 1.0 in</br> | |||
Elastomer shear modulus, G = 0.2 ksi | |||
Check h<sub>rt</sub> at first-slip: | |||
DLmax /A = 50/100.1= 0.5 ksi = 500 psi</br> | |||
μ = 4%</br> | |||
Deflection of bearing pad at first-slip, Δ<sub>s-slip</sub> = ɣ<sub>FR</sub>(μ)DLmax(h<sub>rt</sub>)/(A*G) = 1.0(4/100)50(1.0)/(100.1*0.2) = 0.1 in</br> | |||
h<sub>rt</sub> ≥ 2Δ<sub>s-slip</sub> = 2*0.1= 0.2 in OK</br> | |||
The PTFE sliding surface accommodates the remainder of the thermal movement at the bearing. | |||
Check Average Contact Stress (LRFD 14.7.2.4): | |||
This check will be met by satisfying the maximum compressive stress check for the elastomeric bearing pad. | |||
DLmax/A ≤ 3.0 ksi </br> | |||
50/100.1= 0.5 ksi < 3.0 OK | |||
(DLmax + LL)/A ≤ 4.5 ksi </br> | |||
(50+73)/100.1= 1.23 ksi < 4.5 OK | |||
====751.11.2.5 Multi-Rotational High Load Bearings==== | ====751.11.2.5 Multi-Rotational High Load Bearings==== | ||
| Line 971: | Line 1,194: | ||
Note: The location of anchor bolts in relation to the slotted holes in the sole plate shall correspond with the temperature at the time of erection. At 60°F the slotted holes should center on the anchor bolts. | Note: The location of anchor bolts in relation to the slotted holes in the sole plate shall correspond with the temperature at the time of erection. At 60°F the slotted holes should center on the anchor bolts. | ||
[[Image:751.11.3.1.1 2021.jpg|900px|center]] | |||
[[Image:751.11.3.1.2 2021.jpg|900px|center]] | |||
Notes: | Notes: | ||
| Line 1,003: | Line 1,216: | ||
Note: The location of anchor bolts in relation to the slotted holes in the sole plate shall correspond with the temperature at the time of erection. At 60°F the slotted holes should center on the anchor bolts. | Note: The location of anchor bolts in relation to the slotted holes in the sole plate shall correspond with the temperature at the time of erection. At 60°F the slotted holes should center on the anchor bolts. | ||
[[Image:751.11.3.2.1 Laminated Expansion 2021.jpg|900px|center]] | |||
[[Image:751.11.3.2.2 Laminated Expansion 2021.jpg|900px|center]] | |||
Notes: | Notes: | ||
| Line 1,033: | Line 1,236: | ||
'''Laminated Fixed Bearing''' | '''Laminated Fixed Bearing''' | ||
[[Image:751.11.3.2.1 Laminated Fixed 2021.jpg|900px|center]] | |||
[[Image:751.11.3.2.2 Laminated Fixed 2021.jpg|900px|center]] | |||
Notes: | Notes: | ||
| Line 1,096: | Line 1,289: | ||
'''****''' Designer should verify that minimum dimensions are met or neoprene will melt and flow into the hole during manufacturing of bearing. | '''****''' Designer should verify that minimum dimensions are met or neoprene will melt and flow into the hole during manufacturing of bearing. | ||
Either stopper plates, or both stopper plates and straps shall be used to restrain potential longitudinal, or longitudinal and transverse pad movement, respectively. | |||
If anchor bolts are believed to be insufficient in restraining pad transverse movement, straps shall be used if the maximum distance between the anchor bolt and edge of girder is not exceeded. If straps are not required, or do not fit without exceeding this distance, stopper plates shall still be used and without recessed ends. | |||
| Line 1,112: | Line 1,308: | ||
'''SECTION AT END OF GIRDER''' | '''SECTION AT END OF GIRDER''' | ||
'''*''' See [[751.22 P/S Concrete I Girders#751.22.3. | '''*''' See [[751.22 P/S Concrete I Girders#751.22.3.4 Girder Reinforcement|EPG 751.22.3.4 Girder Reinforcement]] | ||
</center> | </center> | ||
| Line 1,123: | Line 1,319: | ||
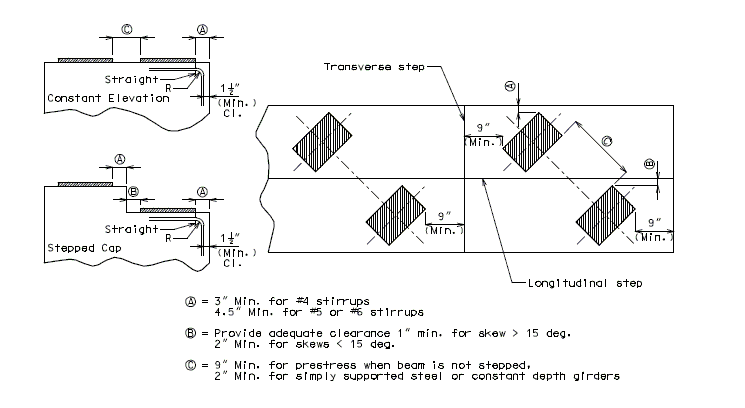
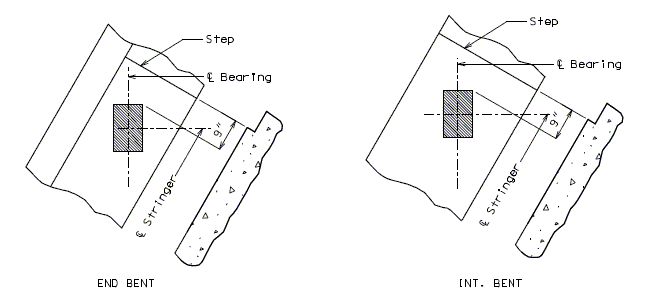
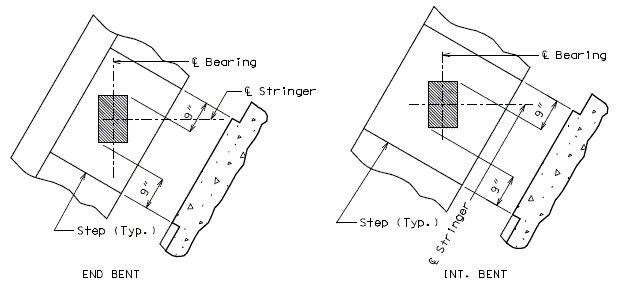
Heavy loads placed near the edge of a concrete surface can produce spalling. Two precautions should be taken to avoid the problem. Additional reinforcement should be placed under the load and around the corner. The bearing area of the load should not project beyond the straight portion of the stirrups, nor beyond the interior face of a transverse anchor bar (if one is provided). The recommended distance to a step, or the end of the bent cap in the transverse direction is 9 inches. | Heavy loads placed near the edge of a concrete surface can produce spalling. Two precautions should be taken to avoid the problem. Additional reinforcement should be placed under the load and around the corner. The bearing area of the load should not project beyond the straight portion of the stirrups, nor beyond the interior face of a transverse anchor bar (if one is provided). The recommended distance to a step, or the end of the bent cap in the transverse direction is 9 inches. | ||
Provide minimum support length in accordance with [https://epg.modot.org/forms/general_files/BR/Bridge_Seismic_Design_Flowchart.pdf Bridge Seismic Design Flowchart]. | |||
'''Bearing Clearance''' | '''Bearing Clearance''' | ||
When beams are placed to end at an intermediate bent, the clearance is governed by the bent up strands, diaphragm reinforcement, skew, and any vertical or horizontal curvature in the profile grade. A 9 inch minimum between bearing pads for | When beams are placed to end at an intermediate bent, the clearance is governed by the bent up strands, diaphragm reinforcement, skew, and any vertical or horizontal curvature in the profile grade. A 9 inch minimum between bearing pads for prestressed girders is a general rule. For simply supported steel or constant depth girders the recommended minimum clearance is 2 inches between bearing pads. See Dimension "C". Also consider transverse girder offsets when using prestressed girders on horizontally curved alignments. | ||
| Line 1,169: | Line 1,366: | ||
Show anchor bolt well locations and details on the plans. | Show anchor bolt well locations and details on the plans. | ||
Only removable forming material is required for forming anchor bolt wells in accordance with [http://www.modot.org/business/standards_and_specs/SpecbookEPG.pdf#page=11 Sec 712] and as determined by the contractor which could include PVC, styrofoam, carboard, etc. In lieu of anchor bolts wells, anchor bolts holes may be drilled when permitted in the field as a contractor option, or where required which shall be noted on the plans. | |||
Drilling anchor bolt holes should not be permitted in the field or made required on the plans unless reinforcement is detailed on plans to clear anchor bolt wells. An example of drilling needing to be required on the plans would be rehabilitations involving existing bent caps. | |||
If uplift is a concern, determine capacity of anchorage based upon strength developed utilizing either well or drilled hole. Use engineering judgment in determining capacity of either system, i.e. friction capacity, grout capacity, anchor capacity. Identify specific method of anchoring required if there is a concern about differences in resistance capacity. | |||
If uplift is a concern, determine capacity of anchorage based upon strength developed utilizing either well or drilled hole. | |||
| Line 1,183: | Line 1,378: | ||
{| | {| | ||
|- | |- | ||
|colspan="4"|[[Image:751.11.3.5 | |colspan="4"|[[Image:751.11.3.5-PartPlan.png|center]] | ||
|- | |- | ||
!SQUARE|| ||style="text-align:center"|SKEWED|| | !SQUARE|| ||style="text-align:center"|SKEWED|| | ||
| Line 1,203: | Line 1,398: | ||
<center> | <center> | ||
[[Image:751.11.3.5 | [[Image:751.11.3.5-AnchorBoltWell.png|center]] | ||
{| border="1" cellspacing="1" cellpadding="3" | {| border="1" cellspacing="1" cellpadding="3" style="text-align:center" | ||
|- | |- | ||
!colspan=" | !colspan="8"|TABLE OF ANCHOR BOLT WELLS | ||
|- | |- | ||
|Anchor Bolt Diameter|| | |Anchor Bolt Diameter||Well Diameter X||Well Depth Y||Spiral Depth B||Spiral Diameter C||W5 Nominal Length||W5 Actual Length||Bolt Extension into Concrete | ||
|- | |- | ||
|1"||3"||12"||9"|| | |1"||3"||12"||9"||8"||14'-10"||14-'6"||9" | ||
|- | |- | ||
|1 1/4"||4"||15"||12"||9 | |1 1/4"||4"||15"||12"||9"||19’-7"||19'-1"||12" | ||
|- | |- | ||
|1 1/2"||4"||18"||15"||9 | |1 1/2"||4"||18"||15"||9"||22'-8"||22'-2"||15" | ||
|- | |- | ||
|2"||4"||21"||18"||9 | |2"||4"||21"||18"||9"||25'-9"||25'-2"||18" | ||
|- | |- | ||
|2 1/2"||4"||28"||25"||9 1 | |2 1/2"||4"||28"||25"||9"||33'-1"||32'-4"||25" | ||
|} | |} | ||
Nominal length is based on out-to-out dimension. Actual length is the measured along the centerline of the W5 wire. Both nominal length and actual length includes the length of the three side wires. | |||
Omit spiral on 21" WF if anchor bolt spacing is less than 6" | Omit spiral on 21" WF if anchor bolt spacing is less than 6". | ||
| Line 1,242: | Line 1,438: | ||
|}</center> | |}</center> | ||
Epoxy coat anchor bolt wells at bents with expansion devices. | |||
'''SWEDGE ANCHOR BOLT DETAILS''' | |||
<center> | <center> | ||
{| style="text-align:center" | {| border="1" class="wikitable" style="margin: 1em auto 1em auto" style="text-align:center" | ||
| | |+ | ||
| | | style="background:#BEBEBE" width="300" |'''[http://www.modot.org/business/consultant_resources/bridgestandards.htm Bridge Standard Drawings]''' | ||
|- | |- | ||
|align="center"|[https://www.modot.org/bearings-brg Bearings - BRG] | |||
|} | |} | ||
</center> | |||
====751.11.3.6 Girder/Beam Chairs==== | ====751.11.3.6 Girder/Beam Chairs==== | ||
'''General''' | |||
Chairs shall also be used for prestressed girders and beams at fixed intermediate bents where minimum dead load or slope requirements cannot be met by elastomeric laminated fixed bearings and under the smaller girder where girder sizes change. | Chairs shall be used at integral bents for prestressed and steel girders and beams if slope requirements cannot be met by elastomeric laminated fixed bearings. | ||
Chairs shall also be used for prestressed girders and beams at fixed intermediate bents where minimum dead load or slope requirements cannot be met by elastomeric laminated fixed bearings and under the smaller girder where girder sizes change. | |||
The following detail is not required on the plan sheets but illustrates the location of the bearing with respect to the 7-inch plate. See [[751.22 Prestressed Concrete I Girders#751.22.3.7.4 Bent Details|EPG 751.22.3.7.4]] for how chairs are shown on the plan of beam. | |||
<center> | |||
[[image:751.11.3.6 general.jpg|center|500px]] | |||
'''PLAN OF CHAIR (Skewed bent)''' | |||
</center> | |||
'''Chair Details''' | |||
{| style="margin: 1em auto 1em auto" | The following details shall be provided on the appropriate bent plan sheets. The beams steps and the construction key are shown to illustrate minimum distances, but these items are not required in these details on the plan sheets. Prestressed I girder shown, all other girders and beams are similar. | ||
<center> | |||
[[image:751.11.3.6 girder.jpg|center|900px]] | |||
'''GIRDER CHAIR DETAILS''' | |||
</center> | |||
:{| style="margin: 1em auto 1em auto" align="center" | |||
|colspan="4"|'''Detailing Guidance:''' | |||
|- | |||
|colspan="4"|See EPG 751.50 ([[751.50 Standard Detailing Notes#A4a3. Miscellaneous|Notes A4a3.1]] and [[751.50 Standard Detailing Notes#(G1.16)|G1.16 thru G1.19]]) for appropriate notes to be placed with details. | |||
|- | |||
|colspan="4"|<font color = "grass">Green</font color = "grass"> items are guidance and shall not be shown on plans. | |||
|- | |||
|width="15"| ||<font color = "grass">(a)</font color = "grass">||3" minimum to beam steps, 9" minimum to end of beam.|| | |||
|- | |- | ||
| | | ||valign="top"|<font color = "grass">(b)</font color = "grass">||1/2" minimum and 5" maximum. Use beam step if necessary. With a change in girder size, use thicker laminated pads on the tall girder side if necessary.||width="300"| | ||
|- | |- | ||
| | | ||<font color = "grass">(c)</font color = "grass">||These dimensions are based on a 17-inch bottom flange, revise accordingly for other widths. | ||
|- | |- | ||
| | | ||valign="top" rowspan="3"|<font color = "grass">(d)</font color = "grass">||3" minimum for steel girders and beams.|| | ||
|- | |- | ||
| | | ||5" minimum for prestressed I girders and bulb-tee girders.|| | ||
| | |||
|- | |- | ||
| | | ||3½" minimum for prestressed NU girders.|| | ||
|} | |} | ||
'''Maximum Service Limit State Load Reaction''' | |||
The maximum service load reaction for the details shown shall be 90 kips. | |||
This limit is based on ASTM A709 Grade 36 steel and bolt pattern shown with bolt threads in the shear plane. | |||
Larger service load reactions will require modified details by design. | |||
When determining service limit state load reaction use DC Loading (excluding barrier or railing) and an additional 50 lb/sf construction load. | |||
'''Possible Variations to Aid in Rebar Placement''' | |||
The following variations of the above details shall be discussed with the Structural Project Manager or Structural Liaison Engineer if required to reduce conflict between the vertical angels and the beam reinforcement. | |||
<center> | |||
[[image:751.11.3.6 variations.jpg|750px]] | |||
</center> | |||
The gap and length of plate is variable and dependent on what is required for rebar placement. The details of the ends of closed concrete intermediate diaphragms will need to be modified from the details shown in [[751.22 Prestressed Concrete I Girders#751.22.3.7 Closed Concrete Intermediate Diaphragms|EPG 751.22.3.7 Closed Concrete Intermediate Diaphragms]]. | |||
[[Category:751 LRFD Bridge Design Guidelines]] | [[Category:751 LRFD Bridge Design Guidelines]] | ||
Latest revision as of 14:38, 11 September 2024
751.11.1 General
751.11.1.1 Bearing Types
Elastomeric bearings are economical bearings. Typically the footprint of elastomeric bearings is rectangular or square; however, circular elastomeric bearings may be considered for skewed bridges or short span curved steel bridges with lower vertical loading, translational and rotational demands where multi-rotational (pot) bearings could be unnecessary overdesign. See Structural Project Manager or Structural Liaison Engineer before using circular elastomeric bearings. Elastomeric bearings may be either plain or laminated (steel reinforced) pads. There are three types of elastomeric bearings utilized by MoDOT based on pad type and function:
- Plain fixed – integral bents only (Use laminated fixed if slope or grade dictates.)
- Laminated fixed (Use girder chairs if minimum dead load, slope or grade dictates.)
- Laminated expansion
PTFE type bearings shall be used when laminated elastomeric expansion bearings are not capable of handling the required expansion length or the required total thickness of elastomer exceeds 5”.
Multi-Rotational High Load Bearings
Pot bearings can be considered for use on bridges when bearing design service reaction exceeds 300 kips or bearing area exceeds 15” x 24” and effects of curvature are considered. Due to high cost, limited use of these types of bearings are recommended. Consult Structural Project Manager before using Pot Bearings.
Chairs shall be used at integral bents for prestressed and steel girders and beams if slope requirements cannot be met by elastomeric laminated fixed bearings.
Chairs shall also be used for prestressed girders and beams at fixed intermediate bents where minimum dead load or slope requirements cannot be met by elastomeric laminated fixed bearings and under the smaller girder where girder sizes change.
Bearing Type Location
The following figure shows an example of what type of bearings should be used at the given locations.

- Integral construction (end bent typ.) – Use plain fixed elastomeric bearing or laminated fixed if necessary.
- Flexible intermediate bent (pile cap) – Use laminated fixed bearings for flexible intermediate bents.
- Rigid intermediate bent w/out thermal expansion – Use laminated fixed bearings at bents with no temperature movement.
- Rigid intermediate bent w/ thermal expansion – Use laminated expansion bearings or PTFE/Pot bearings if necessary.
- Rigid end bent w/ thermal expansion - Use laminated expansion bearings or PTFE/Pot bearings if necessary.
751.11.1.2 Limit States and Load Factors
Limit States and Load Factors
In general, each component shall satisfy the following equation:
Where:
| = Total factored force effect | |
| = Force effect | |
| = Load modifier | |
| = Load factor | |
| = Resistance factor | |
| = Nominal resistance | |
| = Factored resistance |
Limit States
- The following limit states shall be considered for bearing design:
- STRENGTH – I
- SERVICE – I
- See LRFD Table 3.4.1-1 and LRFD 3.42 for Loads and Load Factors applied to each given limit state.
- Service loads without including dynamic load allowances shall be used for bearing design.
Resistance Factors
- STRENGTH limit states, see LRFD Article 6.5.4.2 and 5.5.4.2
- For all other limit states, = 1.00
751.11.2 Design
751.11.2.1 Elastomeric Bearings
General
Elastomeric Bearing design shall follow AASHTO LRFD “Method A”.
The elastomeric expansion bearings and fixed bearings for steel girders consist of a sole plate and elastomeric bearing pad. Elastomeric bearings at integral end bents and fixed bearings for prestressed girders at intermediate bents consist of elastomeric bearing pad without a sole plate.
The sole plates are flat or beveled to match the profile grade of the roadway surface along the centerline of the girder. If the profile grade is equal to or less than 0.01 or the total drop across the bearing is equal to or less than 1/8 inch, then a flat sole plate may be used and if necessary, elastomer thickness increased to address the bearing rotation due to the profile grade. Sole plates are used to anchor girders, ensure uniform distribution of the compressive stress and strain over bearing area and reduce dead load bearing rotations.
At fixed bearings, girder chairs may be considered as an alternate if roadway slope, rotation or bearing pressure is requiring tall or large bearing pads.
The elastomer bearing pad shall be 60 durometer hardness and reinforced with 1/8 inch steel shim plates when laminated pads are required by design.
When rectangular bearings are used, increased rotation bearing capacity can be achieved by orientating the pad with the shorter dimension of the pad parallel with the span of the girder.
Plain elastomeric bearing pads should be utilized where vertical loads, translations and rotations are relatively small. For integral end bents, use ½” fixed plain pads when taper due to girder slope or grade is less than 1/8”, or use a laminated bearing pad when taper equals or exceeds 1/8” due to girder slope or grade. In the rare circumstance when intermediate bents are made integral by extending the beam cap stirrups into the diaphragm, consideration can be given to utilizing ½” plain pads under similar conditions of slope.
Laminated elastomeric bearing pads should be utilized where there is greater need for vertical loading, translational and rotational capacity. For non-integral end bents, non-integral intermediate bents and for integral end bents when taper exceeds 1/8” due to girder slope or grade use laminated elastomeric bearing pads where the pad thickness and number of laminates is based on design that should account for larger vertical loads, translation, rotation and meet slope of girder and grade requirements.
Size Limitations
Use the values in the standard bearing pad tables if possible.
Bearing pad length shall be 8” minimum for MoDOT Standard Prestressed (P/S) I-Girders, Adjacent P/S Box Beams and Steel I-Girders.
Bearing pad length shall be 5” minimum for P/S NU Girders and P/S Spread Box Beams. Not preferred but for consideration of some lower bound limits as used by the Nebraska Department of Roads (NDOR) that developed the NU I-Girder, for P/S NU Girders only, and based on NDOR guidelines, a 4” minimum bearing pad length and/or 2 ft. minimum bearing pad width can be used with Structural Project Manager or Structural Liaison Engineer approval.
Plain Fixed for P/S I-Girder:
W, width of bearing ≤ Bottom flange width – 1.5”
Plain Fixed for steel girders:
Bottom flange width – 2” ≤ W ≤ Bottom flange width
Laminated Fixed for P/S I-Girder:
W = Bottom Flange width – 1.5”
Laminated Expansion Bearing Pads for PS I-Girders and
Laminated Fixed and Expansion Pads for Steel Girders:
9” ≤ W ≤ Bottom flange width + 7”
Stability
The following requirement shall be met for ensuring stability of the bearing pad:
Rectangular Pads
Circular Pads
Temperature Movement
Determining temperature movements for bearings requires the calculation of the thermal origin of the bridge. To accomplish this, the stiffness of each bent must be calculated. Once the thermal origin is established, the total temperature movement for each bearing location can be found by the following equations:
(temperature range)x(distance from thermal origin)(0.65)
Where:
| = maximum shear deformation of the pad | |
| = 1.2 for laminated pads | |
| = 1.0 for PTFE bearings | |
| = coefficient of thermal expansion | |
| = 0.0000065 IN/IN/ºF (steel superstructure) | |
| = 0.000006 IN/IN/ºF (concrete superstructure) | |
| (0.65) | = 65% reduction due to forgiving nature of elastomer (LRFD 14.7.6.3.4) |
| temperature range | = 150ºF (steel superstructure) |
| = 120ºF (concrete superstructure) |
Shear Deformation
Both plain elastomeric and laminated elastomeric shall meet the following criteria for shear deformation.
Where:
= total elastomer thickness, in.
The following table represents the available heights of laminated expansion pads that are required due to the shear deformation criteria. PTFE type bearings shall be used if
| Laminated Expansion Pads | |||||
|---|---|---|---|---|---|
| , in. | Interior layer thickness, in. | Exterior layer thickness, in. | , in. | n | C, in. |
| 1/2 | 1/2 | 1/4 | 1 | 2 | 1 1/4 |
| 3/4 | 1/2 | 1/4 | 1 1/2 | 3 | 1 7/8 |
| 1 | 1/2 | 1/4 | 2 | 4 | 2 1/2 |
| 1 1/4 | 1/2 | 1/4 | 2 1/2 | 5 | 3 1/8 |
| 1 1/2 | 1/2 | 1/4 | 3 | 6 | 3 3/4 |
| 1 3/4 | 1/2 | 1/4 | 3 1/2 | 7 | 4 3/8 |
| 2 | 1/2 | 1/4 | 4 | 8 | 5 |
| 2 1/4 | 1/2 | 1/4 | 4 1/2 | 9 | 5 5/8 |
| 2 1/2 | 1/2 | 1/4 | 5 | 10 | 6 1/4 |
Where:
| C | = total thickness of bearing including steel shims, in. |
| n | = total number of interior layers of elastomer + 1* |
* The additional “1” is accounting for the two exterior layers as per LRFD 14.7.5.3.5
Compressive Stress
Service loads without including dynamic load allowance shall be used for design checks.
At intermediate bents with 2 bearing pads per girder line (i.e. PS I-girders), use ½ of the live load reaction for each pad.
Total Load
Plain Elastomeric Pad
Laminated Elastomeric Pad
and
Minimum Dead Load
The 200 psi minimum requirement is intended for preventing the horizontal crawling of the bearing when it is not attached to the top surface. This requirement has been applied to the bearing designs detailed in EPG 751 even though these bearings are detailed with positive attachment to the flange of the girder. Compliance with the requirement is desirable but is not mandatory if it results in a special bearing design or special superstructure treatments.
Where:
| = compressive stress due to total load = | |
| =compressive stress due to maximum dead load = | |
| =compressive stress due to minimum dead load = | |
| G | = shear modulus = 0.130 ksi for compressive stress calculations |
| S | = shape factor for thickest layer of elastomer = |
| S | = shape factor for circular pads = |
| = thickness of the ith elastomer layer, in. |
Rotation
Rotations shall be taken as the maximum possible change in slope between the top and bottom surfaces of the bearing caused by the initial lack of parallelism between the bottom of girder flange and top of bearing and the girder end rotation due to imposed loads and movements. Rotations may be calculated by a straight-line approximation of dead and live load deflections taken at 1/10 or 1/4 points. The following equation must be satisfied to ensure that uplift does not occur under any combination of loads and corresponding rotation:
Rectangular Laminated Elastomeric Pad
Where:
| L | = length of bearing pad in the direction of traffic |
| W | = width of bearing pad in the direction perpendicular to traffic |
| G | = shear modulus = 0.200 ksi for rotation calculations |
| = maximum rotation about the transverse axis due to initial lack of parallelism and total service load, rad | |
| n | = total number of interior layers of elastomer + 1* |
* The additional “1” is accounting for the two exterior layers as per LRFD 14.7.5.3.5
Plain elastomeric pads contained within integral concrete diaphragms are not subject to this rotation requirement.
This criteria is intended as an uplift check. If uplift is not possible at the bearing due to an integral diaphragm/beam at the abutment or an integral diaphragm/beam at an intermediate bent, then this criteria would not be applicable.
Circular Laminated Elastomeric Pad
Where:
D = diameter of pad
Compressive Deflection
Deflections of elastomeric bearings should be limited to ensure that deck joints and seals are not damaged. Also, bearings that are too flexible can produce a small step across a deck joint giving rise to a high impact loading when traffic passes from one girder to the other. The maximum relative deflection across a joint is suggested to be less than 1/8”.
Initial compressive deflection of plain elastomeric or in any layer of steel reinforced elastomeric bearing at the service limit state without impact shall not exceed .
Values for compressive strain can be calculated by using LRFD Figure C14.7.6.3.3-1 for 60 durometer reinforced bearings.
There is a code check for compressive deflection of a single layer but no code check for total compressive deflection.
Taper
When the difference between the slope of the girder and the slope of a bearing pad exceeds 1/8” taper shall be considered. For laminated expansion pads for both PS I-Girders and steel girders and for laminated fixed pads for steel girders where sole plates are required, sole plates shall be tapered to account for the girder slope. Sole plates shall have a minimum thickness of 1 1/2” at the centerline of bearing, and a minimum thickness of 1” at the edge. Plain fixed pads shall not be tapered. At integral end bents where girder slope is greater than 1/8”, use laminated fixed pads. Laminated bearing taper is provided by tapering the top shim to match the slope of the girder to the nearest 1/8” total difference in thickness. Thickness of shims shall be a minimum of 1/8” and a maximum of 1/2”. For excessive girder slopes it may be necessary to taper the top two shims with a maximum combined taper of the bearing of 3/4 inch. Tapered layers of elastomer are not permitted.
Anchor Bolts
Check with Structural Project Manager or Liaison before using anchor bolts other than ASTM F1554. When anchor bolts are used for laminated fixed for steel girders or laminated expansion for steel and P/S I-girders, they should be designed for a minimum horizontal force equal to 25% of the maximum dead load applied to the bearing. With SPM approval for rehab superstructure job designer may design anchor bolt for a minimum horizontal force equal to 15% of the maximum dead load applied to the bearing. Designer may ignore live load in horizontal force computation. Anchor bolts shall be ASTM F1554 Grade 55 unless higher grade anchor bolts are required to meet design requirements. Grade 105 bolts shall not be used in applications where welding to the bolt is required. (Revise anchor bolt notes in EPG 751.50 Standard Detailing Notes for plans with different grade and nuts, e.g. “ASTM F1554 Grade 55” to “ASTM F1554 Grade 105” and “ASTM A563 Grade A Heavy Hex nuts” to “ASTM A563 Grade DH Heavy Hex nuts”.)
| Bolt properties (Updated in 2022) | ||||||||||
|---|---|---|---|---|---|---|---|---|---|---|
| Bolt Type | Nominal Bolt Diameter (in.) |
Min. Tensile Strength (ksi) |
Min. Yield Strength (ksi) |
Comments | ||||||
| ASTM F1554 (Grade 36) | ½” to 4” | 58 | 36 | Preferred specification for structural supports anchored into concrete. | ||||||
| ASTM F1554 (Grade 55) | ½” to 4” | 75 | 55 | |||||||
| ASTM F1554 (Grade 105) | ½” to 3” | 125 | 105 | |||||||
| ASTM A449 Type 1 Type 3 (weathering) |
¼” to 1” | 120 | 92 | Material properties are applicable for old A325 bolts (Pre-2016). May be manufactured as a threaded rod. | ||||||
| over 1” to 1 ½” | 105 | 81 | ||||||||
| 1 ¾” to 3” | 90 | 58 | Typically used for larger diameter headed anchors for bearings in girder shelves. | |||||||
| ASTM A307 | ¼” to 4” | 60 | NA | Typically used for regular strength steel connections. Should not be used for applications that require significant tensile or flexural forces on the bolt. | ||||||
| ASTM F3125 Grade A325 Type 1 Type 3 (weathering) |
½” to 1 ½” | 120 | 92 | Typically used as high strength fasteners, but also used as headed anchors for bearings in girder shelves. | ||||||
| ASTM F3125 Grade A490 Type 1 Type 3 (weathering) |
½” to 1 ½” | 150 | 130 | Typically used as high-strength fastener. Galvanization is not allowed. | ||||||
| Note: The above table is a comprehensive list for bolts typically used in structural applications on MoDOT projects. These values will aid designers when substitutions need to be made for similar design applications. | ||||||||||
Anchor bolts are used on bearings with sole plates. For bridges that require seismic details only, design anchor bolts for flexure and shear induced from horizontal seismic forces and design for tension due to uplift forces if present. For bridges that require a seismic analysis, design anchor bolts for flexure induced from horizontal seismic forces and separately design for the effects of combined tension and shear.
Limit the number of bolts per bearing to four. Concrete Shear blocks shall be used when anchor bolts cannot be designed to resist earthquake loading. For shear blocks details for P/S girder see, EPG 751.22.3.13 Concrete Shear Blocks. Use similar details for shear blocks for steel girder.
Bearing details are shown in EPG 751.11.3 Details for two 1 ½”, 2” and 2 ½“ diameter anchor bolts. Consult Structural Project Manager before using bolt diameters larger than 2 1/2". Revise bearing details if four anchor bolts are required by design. For larger than 2 ½” diameter anchor bolt revise details in EPG 751.11.3.5 Anchor Bolts, bearing details and anchor bolt notes in EPG 751.50 Standard Detailing Notes.
For seismic details only (strength limit states)
Anchorage shall be adequate to resist lateral loads.
Horizontal factored shear force, in kips per girder
For expansion bearings, transverse FT = 0.25(DL) per girder & longitudinal FL = 0.
Where DL = unfactored dead load reaction at the bent, kips
For fixed bearings, transverse FT = 0.25(DL) per girder and Longitudinal FL = (0.25)(segment weight)/(# of girders)
Segment weight includes the full width of superstructure and should be distributed appropriately among fixed bents.
When centrifugal forces are present, they should be checked independently (not combined with seismic loads shown above or below). Use a 1.75 load factor with the centrifugal force and check resistance at the Strength Limit state as described below.
For complete seismic analysis
Anchor bolt designs must meet requirements for strength limit states from above as well as seismic forces from seismic analysis. Anchorage shall be adequate to resist lateral loads as well as uplift force from seismic analysis.
At Intermediate bent,
where: FH = horizontal seismic force per girder, kips
- If columns are designed for plastic hinging, use the plastic hinging shear.
= summation of top of column longitudinal shears at the bent
= summation of top of column transverse shears at the bent
NG = number of girders at the bent
At end bents
Use the same formula as above, except substitute the abutment shears in place of the top of column shears.
Pu = horizontal factored shear force per bolt, kips
nb = the number of bolts per girder
For intermediate bent, R = 1.0
For end bent, R = 1.0 for seismic category A & B and 0.8 for seismic category C & D.
Flexural Resistance
Factored flexural stress shall be less than or equal to the nominal flexural resistance. Assume the bolt is restrained from rotation by the sole plate, but free to translate.
M = Pu x L/2 = maximum moment per bolt, inch-kips
L = moment arm from center of sole plate to top of the beam cap, inches
S = section modulus for the bolt , cubic inches.
D = minimum body diameter, inches. For F1554 bolts use D = 0.92 x nominal bolt diameter. Alternately, the minimum body diameter can be retrieved from ASTM F1554 Table 4. For all other bolt types the nominal bolt diameter may be used because the bolt is unthreaded in the flexural zone and the minimum body diameter is similar to the nominal diameter.
Where:
∅f = 1.0 resistance factor for seismic details only (strength limit states) and for complete seismic analysis
Yield strength of the anchor bolt, FY = 55 ksi for Grade 55 and FY = 105 ksi for Grade 105
Shear Resistance
Factored shear force shall be less than or equal to the nominal shear resistance.
where:
∅s = 0.75 resistance for seismic details only (strength limit states) and 1.0 for complete seismic analysis
Nominal shear resistance of an F1554 anchor bolt, Rn = 0.5AbFubNs LRFD 6.13.2.12-1, C6.13.2.7 and 14.8.3
Note: ASTM F1554 allows the body diameter of the bolt to be reduced to provide an area not less than the stress area of the threaded portion of the bolt. For this reason, there are no differences in calculation for threads beings included or excluded from the shear plane. If another type of bolt is used for any reason the nominal shear resistance should be determined from LRFD Eq. 6.13.2.7-1 or 2.
Ab = nominal area of the anchor bolt, square inches
Fub = minimum tensile strength of the anchor bolt, ksi
- = 75 ksi for Grade 55, 125 ksi for Grade 105
Ns = number of shear plane per anchor bolt = 1
D = nominal bolt diameter, inches
Tensile Resistance
Factored tensile force shall be less than or equal to the nominal tensile resistance.
T = the maximum seismic tensile (uplift) force (DL ± EQ) per girder from the seismic analysis, kips. If (DL+EQ) and (DL-EQ) are both compressive, then there is no need to design the bolts for tensile force.
Where:
∅t = 0.8 resistance factor for seismic details only (strength limit states) and 1.0 for complete seismic analysis
nb = the number of bolts per girder
Nominal tensile resistance of the anchor bolt, Tn = 0.76AbFub LRFD 6.13.2.10.2-1 and 14.8.3
- where:
- Ab = nominal area of the anchor bolt, square inches
- Fub = minimum tensile strength of the anchor bolt, ksi
- = 75 ksi for Grade 55, 125 ksi for Grade 105
Combined Tension and Shear Resistance
The resistance of anchor bolts for combined tension and shear force shall be determined in accordance with LRFD 6.13.2.11.
If , then Tn = 0.76AbFub LRFD 6.13.2.11-1
Otherwise
- LRFD 6.13.2.11-2
Strength Limit States and Seismic Details only
Maximum horizontal factored shear force reaction, FH for given anchor bolts and total thickness of bearing including steel shims:
| Max. shear deformation of the pad, ∆s, in. | 1/4 | 1/2 | 3/4 | 1 | 1 1/4 | 1 1/2 | 1 3/4 | 2 | 2 1/4 | ||
|---|---|---|---|---|---|---|---|---|---|---|---|
| Total thick. of bearing including steel shims, C in. | 1 1/4 | 1 7/8 | 2 1/2 | 3 1/8 | 3 3/4 | 4 3/8 | 5 | 5 5/8 | 6 1/4 | ||
| Anchor Bolt Type | No. of Anchor Bolt |
Nominal dia. of anchor bolt, in. | Maximum horizontal factored shear force reaction, FH | ||||||||
| ASTM F1554 Grade 55 |
2 | 1.5 | 28 | 22 | 17 | 15 | 13 | 11 | 10 | 9 | 8 |
| 2 | 67 | 51 | 41 | 35 | 30 | 26 | 23 | 21 | 19 | ||
| 2.5 | 131 | 100 | 81 | 68 | 58 | 51 | 46 | 41 | 38 | ||
| 4 | 1.5 | 57 | 43 | 35 | 29 | 25 | 22 | 20 | 18 | 16 | |
| 2 | 135 | 103 | 83 | 69 | 60 | 53 | 47 | 42 | 38 | ||
| 2.5 | 263 | 200 | 162 | 136 | 117 | 103 | 91 | 82 | 75 | ||
| ASTM F1554 Grade 105 |
2 | 1.5 | 54 | 41 | 33 | 28 | 24 | 21 | 19 | 17 | 15 |
| 2 | 128 | 98 | 79 | 66 | 57 | 50 | 45 | 40 | 37 | ||
| 2.5 | 251 | 191 | 154 | 129 | 111 | 98 | 87 | 79 | 72 | ||
| 4 | 1.5 | 108 | 83 | 67 | 56 | 48 | 42 | 38 | 34 | 31 | |
| 2 | 257 | 196 | 158 | 133 | 114 | 100 | 89 | 81 | 73 | ||
| 2.5 | 502 | 382 | 309 | 259 | 223 | 196 | 174 | 157 | 143 | ||
| Notes: | Calculations were based on 1-1/2" thick sole plate at centerline of bearing. Flexural resistance calculations were based on minimum body diameter of the anchor bolt. For centrifugal forces, check anchor bolts for separate load. For complete seismic analysis case, design anchor bolts as explained above. | ||||||||||
751.11.2.2 Standard Pad Tables for P/S I-Girders
| Bottom Flange Width in. | L in. | W in. | S Int. Layer | S Ext.Layer | DL min kips | DLmax + LL kips | |
| 17 | 9 | 12 | 5.14 | 10.29 | 21.6 | 72.2 | 0.669 |
| 17 | 10 | 14 | 5.83 | 11.67 | 28.0 | 106.2 | 0.758 |
| 17 | 11 | 15.5 | 6.43 | 12.87 | 34.1 | 142.6 | 0.836 |
| 17 | 12 | 15.5 | 6.76 | 13.53 | 37.2 | 163.5 | 0.879 |
| 17 | 13 | 15.5 | 7.07 | 14.14 | 40.3 | 185.2 | 0.919 |
| 17 | 14 | 15.5 | 7.36 | 14.71 | 43.4 | 207.5 | 0.956 |
| 18 | 9 | 12 | 5.14 | 10.29 | 21.6 | 72.2 | 0.669 |
| 18 | 10 | 14 | 5.83 | 11.67 | 28.0 | 106.2 | 0.758 |
| 18 | 11 | 16 | 6.52 | 13.04 | 35.2 | 149.1 | 0.847 |
| 18 | 12 | 16.5 | 6.95 | 13.89 | 39.6 | 178.8 | 0.903 |
| 18 | 13 | 16.5 | 7.27 | 14.54 | 42.9 | 202.8 | 0.945 |
| 18 | 14 | 16.5 | 7.57 | 15.15 | 46.2 | 227.4 | 0.985 |
| 19 | 9 | 13 | 5.32 | 10.64 | 23.4 | 80.9 | 0.691 |
| 19 | 10 | 14 | 5.83 | 11.67 | 28.0 | 106.2 | 0.758 |
| 19 | 11 | 16 | 6.52 | 13.04 | 35.2 | 149.1 | 0.847 |
| 19 | 12 | 17.5 | 7.12 | 14.24 | 42.0 | 194.3 | 0.925 |
| 19 | 13 | 17.5 | 7.46 | 14.92 | 45.5 | 220.6 | 0.970 |
| 19 | 14 | 17.5 | 7.78 | 15.56 | 49.0 | 245.0 | 1.000 |
| 24 | 12 | 18 | 7.20 | 14.40 | 43.2 | 202.2 | 0.936 |
| 24 | 13 | 20 | 7.88 | 15.76 | 52.0 | 260.0 | 1.000 |
| 24 | 14 | 22 | 8.56 | 17.11 | 61.6 | 308.0 | 1.000 |
| 24 | 15 | 22.5 | 9.00 | 18.00 | 67.5 | 337.5 | 1.000 |
| 24 | 16 | 22.5 | 9.35 | 18.70 | 72.0 | 360.0 | 1.000 |
| 24 | 17 | 22.5 | 9.68 | 19.37 | 76.5 | 382.5 | 1.000 |
| 24 | 18 | 22.5 | 10.00 | 20.00 | 81.0 | 405.0 | 1.000 |
Note:
Pads shown in table must be checked for:
Shear deformation, Stability, Rotation, and Compressive deflection.
| Bottom Flange Width in. | L in. | W in. | S Ext.Layer | DL min kips | DLmax + LL kips | |
| 17 | 8 | 15.5 | 10.55 | 24.8 | 124.0 | 1.000 |
| 17 | 9 | 15.5 | 11.39 | 27.9 | 139.5 | 1.000 |
| 17 | 10 | 15.5 | 12.16 | 31.0 | 155.0 | 1.000 |
| 17 | 11 | 15.5 | 12.87 | 34.1 | 170.5 | 1.000 |
| 17 | 12 | 15.5 | 13.53 | 37.2 | 186.0 | 1.000 |
| 17 | 13 | 15.5 | 14.14 | 40.3 | 201.5 | 1.000 |
| 17 | 14 | 15.5 | 14.71 | 43.4 | 217.0 | 1.000 |
| 18 | 8 | 16.5 | 10.78 | 26.4 | 132.0 | 1.000 |
| 18 | 9 | 16.5 | 11.65 | 29.7 | 148.5 | 1.000 |
| 18 | 10 | 16.5 | 12.45 | 33.0 | 165.0 | 1.000 |
| 18 | 11 | 16.5 | 13.20 | 36.3 | 181.5 | 1.000 |
| 18 | 12 | 16.5 | 13.89 | 39.6 | 198.0 | 1.000 |
| 18 | 13 | 16.5 | 14.54 | 42.9 | 214.5 | 1.000 |
| 18 | 14 | 16.5 | 15.15 | 46.2 | 231.0 | 1.000 |
| 19 | 8 | 17.5 | 10.98 | 28.0 | 140.0 | 1.000 |
| 19 | 9 | 17.5 | 11.89 | 31.5 | 157.5 | 1.000 |
| 19 | 10 | 17.5 | 12.73 | 35.0 | 175.0 | 1.000 |
| 19 | 11 | 17.5 | 13.51 | 38.5 | 192.5 | 1.000 |
| 19 | 12 | 17.5 | 14.24 | 42.0 | 210.0 | 1.000 |
| 19 | 13 | 17.5 | 14.92 | 45.5 | 227.5 | 1.000 |
| 19 | 14 | 17.5 | 15.56 | 49.0 | 245.0 | 1.000 |
| 24 | 8 | 22.5 | 11.80 | 36.0 | 180.0 | 1.000 |
| 24 | 9 | 22.5 | 12.86 | 40.5 | 202.5 | 1.000 |
| 24 | 10 | 22.5 | 13.85 | 45.0 | 225.0 | 1.000 |
| 24 | 11 | 22.5 | 14.78 | 49.5 | 247.5 | 1.000 |
| 24 | 12 | 22.5 | 15.65 | 54.0 | 270.0 | 1.000 |
| 24 | 13 | 22.5 | 16.48 | 58.5 | 292.5 | 1.000 |
| 24 | 14 | 22.5 | 17.26 | 63.0 | 315.0 | 1.000 |
| 24 | 15 | 22.5 | 18.00 | 67.5 | 337.5 | 1.000 |
Note:
Pads sizes in above tables (not at integral bents) must be checked for:
Shear deformation, Stability, Rotation, and Compressive deflection.
For pads at integral bents:
Shear deformation and Rotation need not be checked.
For fixed bearings requiring more than two layers of 1/4” elastomer separated by 1/8” shim, use shape factor calculated for the interior layer of elastomer in the laminated expansion bearing pad table.
| Bottom Flange Width in. | L in. | W in. | S Single Layer | DL min kips | DLmax + LL kips | |
| 17 | 9 | 12 | 5.14 | 21.6 | 86.4 | 0.800 |
| 17 | 9 | 14 | 5.48 | 25.2 | 100.8 | 0.800 |
| 17 | 9 | 15.5 | 5.69 | 27.9 | 111.6 | 0.800 |
| 17 | 10 | 14 | 5.83 | 28.0 | 112.0 | 0.800 |
| 17 | 10 | 15.5 | 6.08 | 31.0 | 124.0 | 0.800 |
| 17 | 11 | 15.5 | 6.43 | 34.1 | 136.4 | 0.800 |
| 17 | 12 | 15.5 | 6.76 | 37.2 | 148.8 | 0.800 |
| 17 | 13 | 15.5 | 7.07 | 40.3 | 161.2 | 0.800 |
| 17 | 14 | 15.5 | 7.36 | 43.4 | 173.6 | 0.800 |
| 18 | 9 | 12 | 5.14 | 21.6 | 86.4 | 0.800 |
| 18 | 9 | 14 | 5.48 | 25.2 | 100.8 | 0.800 |
| 18 | 9 | 16.5 | 5.82 | 29.7 | 118.8 | 0.800 |
| 18 | 10 | 14 | 5.83 | 28.0 | 112.0 | 0.800 |
| 18 | 10 | 16.5 | 6.23 | 33.0 | 132.0 | 0.800 |
| 18 | 11 | 16 | 6.52 | 35.2 | 140.8 | 0.800 |
| 18 | 11 | 16.5 | 6.60 | 36.3 | 145.2 | 0.800 |
| 18 | 12 | 16.5 | 6.95 | 39.6 | 158.4 | 0.800 |
| 18 | 13 | 16.5 | 7.27 | 42.9 | 171.6 | 0.800 |
| 18 | 14 | 16.5 | 7.57 | 46.2 | 184.8 | 0.800 |
| 19 | 9 | 13 | 5.32 | 23.4 | 93.6 | 0.800 |
| 19 | 9 | 15 | 5.63 | 27.0 | 108.0 | 0.800 |
| 19 | 9 | 17.5 | 5.94 | 31.5 | 126.0 | 0.800 |
| 19 | 10 | 14 | 5.83 | 28.0 | 112.0 | 0.800 |
| 19 | 10 | 16 | 6.15 | 32.0 | 128.0 | 0.800 |
| 19 | 10 | 17.5 | 6.36 | 35.0 | 140.0 | 0.800 |
| 19 | 11 | 17.5 | 6.75 | 38.5 | 154.0 | 0.800 |
| 19 | 12 | 17.5 | 7.12 | 42.0 | 168.0 | 0.800 |
| 19 | 13 | 17.5 | 7.46 | 45.5 | 182.0 | 0.800 |
| 19 | 14 | 17.5 | 7.78 | 49.0 | 196.0 | 0.800 |
| 24 | 12 | 18 | 7.20 | 43.2 | 172.8 | 0.800 |
| 24 | 12 | 20 | 7.50 | 48.0 | 192.0 | 0.800 |
| 24 | 12 | 22.5 | 7.83 | 54.0 | 216.0 | 0.800 |
| 24 | 13 | 20 | 7.88 | 52.0 | 208.0 | 0.800 |
| 24 | 13 | 22.5 | 8.24 | 58.5 | 234.0 | 0.800 |
| 24 | 14 | 22.5 | 8.63 | 63.0 | 252.0 | 0.800 |
| 24 | 15 | 22.5 | 9.00 | 67.5 | 270.0 | 0.800 |
| 24 | 16 | 22.5 | 9.35 | 72.0 | 288.0 | 0.800 |
| 24 | 17 | 22.5 | 9.68 | 76.5 | 306.0 | 0.800 |
| 24 | 18 | 22.5 | 10.00 | 81.0 | 324.0 | 0.800 |
Note:
For integral bents, use a laminated bearing when taper over 1/8” is required.
751.11.2.3 Standard Pad Tables for Steel Girders
| L in. | W in. | S Single Layer | DL min kips | DLmax + LL kips | |
| 10 | 10 | 5.00 | 20.0 | 80.0 | 0.800 |
| 12 | 10 | 5.45 | 24.0 | 96.0 | 0.800 |
| 14 | 10 | 5.83 | 28.0 | 112.0 | 0.800 |
| 10 | 11 | 5.24 | 22.0 | 88.0 | 0.800 |
| 12 | 11 | 5.74 | 26.4 | 105.6 | 0.800 |
| 14 | 11 | 6.16 | 30.8 | 123.2 | 0.800 |
| 12 | 12 | 6.00 | 28.8 | 115.2 | 0.800 |
| 14 | 12 | 6.46 | 33.6 | 134.4 | 0.800 |
| 16 | 12 | 6.86 | 38.4 | 153.6 | 0.800 |
| 12 | 13 | 6.24 | 31.2 | 124.8 | 0.800 |
| 14 | 13 | 6.74 | 36.4 | 145.6 | 0.800 |
| 16 | 13 | 7.17 | 41.6 | 166.4 | 0.800 |
| 12 | 14 | 6.46 | 33.6 | 134.4 | 0.800 |
| 14 | 14 | 7.00 | 39.2 | 156.8 | 0.800 |
| 16 | 14 | 7.47 | 44.8 | 179.2 | 0.800 |
| 14 | 15 | 7.24 | 42.0 | 168.0 | 0.800 |
| 16 | 15 | 7.74 | 48.0 | 192.0 | 0.800 |
| 18 | 15 | 8.18 | 54.0 | 216.0 | 0.800 |
| 14 | 16 | 7.47 | 44.8 | 179.2 | 0.800 |
| 16 | 16 | 8.00 | 51.2 | 204.8 | 0.800 |
| 18 | 16 | 8.47 | 57.6 | 230.4 | 0.800 |
| 14 | 17 | 7.68 | 47.6 | 190.4 | 0.800 |
| 16 | 17 | 8.24 | 54.4 | 217.6 | 0.800 |
| 18 | 17 | 8.74 | 61.2 | 244.8 | 0.800 |
| 16 | 18 | 8.47 | 57.6 | 230.4 | 0.800 |
| 18 | 18 | 9.00 | 64.8 | 259.2 | 0.800 |
| 20 | 18 | 9.47 | 72.0 | 288.0 | 0.800 |
| 16 | 19 | 8.69 | 60.8 | 243.2 | 0.800 |
| 18 | 19 | 9.24 | 68.4 | 273.6 | 0.800 |
| 20 | 19 | 9.74 | 76.0 | 304.0 | 0.800 |
| 18 | 20 | 9.47 | 72.0 | 288.0 | 0.800 |
| 20 | 20 | 10.00 | 80.0 | 320.0 | 0.800 |
| 22 | 20 | 10.48 | 88.0 | 352.0 | 0.800 |
- Use only plain pads at integral bents. Do not use sole plate.
- Use girder chairs instead of widening beam.
| B min. | L in. | W in. | S Int. Layer | S Ext. Layer | max in. | max in. | DL min kips | DLmax + LL kips | |
| 9 | 9 | 12 | 5.14 | 10.29 | 3.0 | 1.50 | 21.6 | 72.2 | 0.669 |
| 9 | 10 | 14 | 5.83 | 11.67 | 3.0 | 1.50 | 28.0 | 106.2 | 0.758 |
| 9 | 11 | 16 | 6.52 | 13.04 | 3.5 | 1.75 | 35.2 | 149.1 | 0.847 |
| 11 | 12 | 18 | 7.20 | 14.40 | 4.0 | 2.00 | 43.2 | 202.2 | 0.936 |
| 13 | 13 | 20 | 7.88 | 15.76 | 4.0 | 2.00 | 52.0 | 260.0 | 1.000 |
| 15 | 14 | 22 | 8.56 | 17.11 | 4.5 | 2.25 | 61.6 | 308.0 | 1.000 |
| 17 | 15 | 24 | 9.23 | 18.46 | 5.0 | 2.50 | 72.0 | 360.0 | 1.000 |
| 19 | 16 | 26 | 9.90 | 19.81 | 5.0 | 2.50 | 83.2 | 416.0 | 1.000 |
| 21 | 17 | 28 | 10.58 | 21.16 | 5.0 | 2.50 | 95.2 | 476.0 | 1.000 |
| 23 | 18 | 30 | 11.25 | 22.50 | 5.0 | 2.50 | 108.0 | 540.0 | 1.000 |
| 27 | 20 | 34 | 12.59 | 25.19 | 5.0 | 2.50 | 136.0 | 680.0 | 1.000 |
| 9 | 12 | 9 | 5.14 | 10.29 | 3.0 | 1.50 | 21.6 | 72.2 | 0.669 |
| 9 | 14 | 10 | 5.83 | 11.67 | 3.0 | 1.50 | 28.0 | 106.2 | 0.758 |
| 9 | 16 | 11 | 6.52 | 13.04 | 3.5 | 1.75 | 35.2 | 149.1 | 0.847 |
| 9 | 18 | 12 | 7.20 | 14.40 | 4.0 | 2.00 | 43.2 | 202.2 | 0.936 |
| 9 | 20 | 13 | 7.88 | 15.76 | 4.0 | 2.00 | 52.0 | 260.0 | 1.000 |
| 9 | 22 | 14 | 8.56 | 17.11 | 4.5 | 2.25 | 61.6 | 308.0 | 1.000 |
| 9 | 24 | 15 | 9.23 | 18.46 | 5.0 | 2.50 | 72.0 | 360.0 | 1.000 |
| 9 | 26 | 16 | 9.90 | 19.81 | 5.0 | 2.50 | 83.2 | 416.0 | 1.000 |
| 10 | 28 | 17 | 10.58 | 21.16 | 5.0 | 2.50 | 95.2 | 476.0 | 1.000 |
| 11 | 30 | 18 | 11.25 | 22.50 | 5.0 | 2.50 | 108.0 | 540.0 | 1.000 |
| 13 | 34 | 20 | 12.59 | 25.19 | 5.0 | 2.50 | 136.0 | 680.0 | 1.000 |
Where:
| B min | = minimum allowable bottom flange width |
| max | = maximum allowable total thickness of elastomer |
| max | = maximum allowable shear deformation |
| DL min | = DC |
| DL max | = DC + DW |
751.11.2.4 PTFE (Polytetraflouroethylene) Bearings
General
PTFE bearings shall be used if Δs > 2.5 in.
PTFE sliding bearing shall consist of a lower unit and an upper unit as follows:
The lower unit shall be PTFE bonded to a 1/8” stainless steel plate which is vulcanized to a laminated neoprene pad.
The upper unit shall be a 1/8” highly polished stainless steel plate welded to a steel sole plate.
70 Durometer hardness and shear modulus G = 0.2 ksi is to be used for sliding bearings.
Internal and external layers of elastomer shall be 0.5-inch and 0.25-inch thick, respectively.
The laminated neoprene pad shall contain at least one internal layer of elastomer. Providing an internal layer ensures that Method A may be used for design in accordance with LRFD 14.7.6.
The laminated neoprene elastomer pad shall meet the design requirements of 751.11.2.1, except shear deformation (i.e., deflection of bearing pad at first-slip) shall be checked as shown in the example below.
PTFE Sliding Surface Design
The following table represents the coefficients of friction for the design of PTFE sliding surfaces and are to be used instead of LRFD Table 14.7.2.5-1.
| PTFE Types | Coefficient of Friction, μ | ||||
|---|---|---|---|---|---|
| 200 psi | 400 psi | 600 psi | 800 psi | 1000 psi | |
| Unfilled - Flat | 7% | 7% | 6% | 6% | 6% |
| Filled - Flat | 20% | 16% | 13% | 10% | 8% |
| Unfilled - Dimpled | 4% | 3% | 3% | 3% | 3% |
| Filled - Dimpled | 5% | 4% | 4% | 4% | 4% |
Note:
Vertical pressure = DLmax/A, where A is the total PTFE surface area minus the dimpled area, if applicable.
Intermediate values may be determined by interpolation. Integer values shall be used for plans reporting.
Dimpled PTFE sliding surfaces are the preferred PTFE type. Flat PTFE may be used with SPM or SLE approval. The contractor is allowed to use unfilled or filled pads so the filled values should be used in design.
Dimpled PTFE surfaces are lubricated.
Filled PTFE surfaces incorporate glass fibers, carbon fibers, or other chemically inert filler. The primary reason behind the application of such blended fibers is to reduce creep, i.e., cold flow, and wear.
PTFE Design Example – Filled -Dimpled
PTFE dimensions are the same as the bearing pad dimensions.
Service DLmax = 50 kips
Service LL = 73 kips
PTFE length, L = 11 in
PTFE width, W = 13 in
PTFE surface area, A = 143 - (30/100)143 = 100.1 in2, assume dimpled area is 30% of total PTFE surface area
Total elastomer thickness, hrt = 1.0 in
Elastomer shear modulus, G = 0.2 ksi
Check hrt at first-slip:
DLmax /A = 50/100.1= 0.5 ksi = 500 psi
μ = 4%
Deflection of bearing pad at first-slip, Δs-slip = ɣFR(μ)DLmax(hrt)/(A*G) = 1.0(4/100)50(1.0)/(100.1*0.2) = 0.1 in
hrt ≥ 2Δs-slip = 2*0.1= 0.2 in OK
The PTFE sliding surface accommodates the remainder of the thermal movement at the bearing.
Check Average Contact Stress (LRFD 14.7.2.4):
This check will be met by satisfying the maximum compressive stress check for the elastomeric bearing pad.
DLmax/A ≤ 3.0 ksi
50/100.1= 0.5 ksi < 3.0 OK
(DLmax + LL)/A ≤ 4.5 ksi
(50+73)/100.1= 1.23 ksi < 4.5 OK
751.11.2.5 Multi-Rotational High Load Bearings
General
Pot and Disc bearings are the most commonly used multi-rotational bearings. Pot bearings carry vertical loads by compression of an elastomeric disc confined in a steel cylinder and accommodates rotation by deformation of the disc. Disc bearings accommodate vertical loads and rotation through the deformation of an unconfined or partially confined single elastomeric disc that is molded from a urethane compound.
Pot and disc bearings are commonly available in three different types:
1)Fixed – movement is not allowed and horizontal forces can be resisted from any direction.
2)Guided Expansion – allows for free movement in one direction. Horizontal forces can be resisted perpendicular to the free movement direction. For curved bridges, assume the free movement direction to be along a chord connecting the ends of the beam.
3)Expansion – unguided movement is allowed in all horizontal directions. Horizontal forces cannot be resisted.
The following design information shall be shown on the bearing sheets for each bearing location.
- Type (fixed, guided-expansion, expansion)
- Maximum Vertical Design Load
- Minimum Vertical Design Load
- Lateral Design Load (only when exceeding 10% of the Vertical Design Load)
- Total Required Movement
- Minimum Required Rotation
- Slope of girder bottom
- Bottom of girder elevations at centerline of bearing
- Maximum Estimated Bearing Assembly Height
- Location, Size, and Number of anchor bolts
- Length and Width of masonry plate
Include the following note on the appropriate substructure sheets when multi-rotational bearings are used:
- “Any modifications required to meet the height of bearings shown on bridge plans will be the responsibility of the contractor. Cost of any modification required shall be borne by the contractor.”
Inverted pot bearing configurations are not permitted.
Design
Pot or disc bearing design for structures shall follow LRFD 14.7.4 or 14.7.8 respectively.
Maximum and Minimum vertical loads shall be determined at the Service-I limit state. The minimum vertical load should not be less then 20 percent of the maximum vertical design load.
The lateral load provided by the manufacturer may be assumed 10 percent of the total vertical load. If applicable strength or extreme event load combinations result in a load greater than 10 percent, the required load shall be shown on the plans.
The total temperature movement required at a bent may be calculated using the procedure given in this section. Transverse movements should also be considered for large roadway widths. On wide roadways (greater than 40’) an increase in the standard clearance between the guide bar and bearing may be required.
The rotation due to factored loads, , shall be determined from the controlling strength limit state. The minimum rotation required shall include an additional 0.01 radians for fabrication and installation tolerances and uncertainties.
Due to a variety of preferences among multi-rotational bearing fabricators, explicit details are not provided in the plans. Instead, the fabricator determines the sizes of all the bearing components, from the masonry plate to the sole plate. As a guide, the following equation may be used to estimate the height of the assembly for design or the table below.
- H = 6.5 + P/ 400
- Where:
- P = Total load calculated at the service-I limit state (excluding impact), k
- H = Height of the bearing assembly measured from the bottom of the girder to the beam seat elevation, in
When determining the longitudinal load distributed to the substructure for expansion bearings, a friction coefficient of 0.05 shall be used.
Details
Bevel sole plate to match the slope of girder to the nearest 1/8” total difference in thickness across the plate.
When large movements are anticipated at a bearing location, three pairs of bearing stiffeners should be considered to help distribute the load.
Minimum of four anchor bolts are required for the connection of the masonry plate to the substructure.
Estimated Pot Bearing Dimensions
The values shown are from one manufacturer and are based on assumed horizontal load requirements (Seismic Performance Category A). The designer should contact manufacturers with specific requirements for their products to get more detailed information on bearing dimensions.
These tables are to be used as a reference to assist the designer in estimating the size of the sole plate and the masonry plate.
| Dimensions for Guided Expansion Bearing | Dimensions for Fixed | |||||||||||
| Total Vertical Load kips | Total Horiz. Load kips | A Inches | B Inches | O.D. Inches | D Inches | Total Vertical Load kips | Total Horiz. Load kips | A Inches | B Inches | O.D. Inches | D Inches | |
| 50 | 10 | 10 | 10.25 | 6.375 | 4.125 | 50 | 10 | 6.5 | 6.5 | 6.375 | 3 | |
| 75 | 14.9 | 11 | 11.25 | 7.25 | 4.25 | 75 | 14.9 | 7.5 | 7.5 | 7.25 | 3 | |
| 100 | 20 | 11.75 | 12.25 | 8.125 | 4.5 | 100 | 20 | 8.25 | 8.25 | 8.125 | 3.25 | |
| 150 | 30 | 14.25 | 13.5 | 10 | 4.875 | 150 | 30 | 9.75 | 9.75 | 10 | 3.375 | |
| 200 | 40 | 15.75 | 14.5 | 11.75 | 5 | 200 | 40 | 10.75 | 10.75 | 11.75 | 3.5 | |
| 250 | 50 | 17.75 | 16 | 12.875 | 5.5 | 250 | 50 | 11.75 | 11.75 | 12.875 | 3.625 | |
| 300 | 60 | 19.25 | 16.25 | 14.25 | 6 | 300 | 60 | 12.75 | 12.75 | 14.25 | 3.625 | |
| 350 | 70 | 20 | 18.25 | 15.875 | 6.375 | 350 | 70 | 13.5 | 13.5 | 15.875 | 4.125 | |
| 400 | 80 | 22.25 | 19 | 17.125 | 6.875 | 400 | 80 | 14.5 | 14.5 | 17.125 | 4.125 | |
| 450 | 90 | 23 | 19 | 18.375 | 7 | 450 | 90 | 15 | 15 | 18.375 | 4.125 | |
| 500 | 100 | 23.75 | 22.75 | 19.375 | 7 | 500 | 100 | 15.75 | 15.75 | 19.375 | 4.25 | |
| 550 | 110 | 24.5 | 22.75 | 19.75 | 7.375 | 550 | 110 | 16.5 | 16.5 | 19.75 | 4.375 | |
| 600 | 120 | 26.5 | 22.75 | 21.375 | 8.25 | 600 | 120 | 17 | 17 | 21.375 | 4.625 | |
| 650 | 130 | 27.25 | 22.75 | 22.625 | 8.25 | 650 | 130 | 17.75 | 17.75 | 22.625 | 4.75 | |
| 700 | 140 | 27.75 | 27.25 | 23.625 | 8.375 | 700 | 140 | 18.25 | 18.25 | 23.625 | 4.75 | |
| 750 | 150 | 28.25 | 27.25 | 24.125 | 8.5 | 750 | 150 | 18.75 | 18.75 | 24.125 | 4.875 | |
| 800 | 160 | 28.25 | 27.25 | 25 | 8.875 | 800 | 160 | 19.5 | 19.5 | 25 | 5 | |
| 850 | 170 | 30.75 | 26.5 | 25.875 | 9.375 | 850 | 170 | 20 | 20 | 25.875 | 5 | |
| 900 | 180 | 31.5 | 26.5 | 26.75 | 9.375 | 900 | 180 | 20.5 | 20.5 | 26.75 | 5 | |
| 950 | 190 | 32 | 31.75 | 26.875 | 9.625 | 950 | 190 | 21 | 21 | 26.875 | 5.375 | |
| 1000 | 200 | 32.25 | 31.75 | 27.5 | 9.75 | 1000 | 200 | 21.5 | 21.5 | 27.5 | 5.375 | |
| 1100 | 220 | 33.5 | 31.75 | 28.875 | 9.875 | 1100 | 220 | 22.25 | 22.25 | 28.875 | 5.5 | |
| 1200 | 240 | 26.75 | 26.5 | 30.75 | 10.375 | 1200 | 240 | 23.25 | 23.25 | 30.75 | 5.625 | |
| 1300 | 260 | 27.875 | 27.5 | 32.25 | 10.625 | 1300 | 260 | 24 | 24 | 32.25 | 5.75 | |
| 1400 | 280 | 28.75 | 28.25 | 32.625 | 11.125 | 1400 | 280 | 25 | 25 | 32.625 | 6.125 | |
| 1500 | 300 | 29.625 | 29 | 33.5 | 11.5 | 1500 | 300 | 25.75 | 25.75 | 33.5 | 6.125 | |
| 1600 | 320 | 30.5 | 29.75 | 34.75 | 11.75 | 1600 | 320 | 26.5 | 26.5 | 34.75 | 6.25 | |
| 1700 | 340 | 31.5 | 30.5 | 35.75 | 12 | 1700 | 340 | 27.25 | 27.25 | 35.75 | 6.375 | |
| 1800 | 360 | 32.5 | 31.5 | 37 | 12.25 | 1800 | 360 | 28 | 28 | 37 | 6.5 | |
| 1900 | 380 | 33 | 33.125 | 37.375 | 12.5 | 1900 | 380 | 28.5 | 28.5 | 37.375 | 6.75 | |
| 2000 | 400 | 33.75 | 35.125 | 38.125 | 12.5 | 2000 | 400 | 29.25 | 29.25 | 38.125 | 6.875 | |
| 2100 | 420 | 34.25 | 38.125 | 39.125 | 12.375 | 2100 | 420 | 30 | 30 | 39.125 | 6.875 | |
| 2200 | 440 | 35 | 38 | 40.125 | 12.625 | 2200 | 440 | 30.5 | 30.5 | 40.125 | 6.875 | |
| 2300 | 460 | 35.875 | 38.75 | 41.625 | 13.125 | 2300 | 460 | 31.25 | 31.25 | 41.625 | 7.25 | |
| 2400 | 480 | 36.25 | 41.25 | 41.875 | 13.125 | 2400 | 480 | 31.75 | 31.75 | 41.875 | 7.5 | |
| 2500 | 500 | 37.125 | 42 | 42.625 | 13.375 | 2500 | 500 | 32.5 | 32.5 | 42.625 | 7.625 | |
| 2600 | 520 | 37.875 | 42.75 | 43.5 | 13.625 | 2600 | 520 | 33 | 33 | 43.5 | 7.625 | |
| 2700 | 540 | 38.5 | 43.25 | 44.375 | 13.75 | 2700 | 540 | 33.75 | 33.75 | 44.375 | 7.75 | |
| 2800 | 560 | 39.125 | 43.75 | 45.25 | 14 | 2800 | 560 | 34.25 | 34.25 | 45.25 | 7.75 | |
| 2900 | 580 | 40 | 44.5 | 46.25 | 14.125 | 2900 | 580 | 34.75 | 34.75 | 46.25 | 7.875 | |
| 3000 | 600 | 40.5 | 45 | 46.625 | 14.375 | 3000 | 600 | 35.25 | 35.25 | 46.625 | 7.875 | |
| 3100 | 620 | 41.125 | 45.5 | 45.625 | 14.75 | 3100 | 620 | 36 | 36 | 45.625 | 8.25 | |
| 3200 | 640 | 41.75 | 46 | 46.875 | 15.125 | 3200 | 640 | 36.5 | 36.5 | 46.875 | 8.375 | |
| 3300 | 660 | 42.375 | 46.5 | 47.625 | 15.375 | 3300 | 660 | 37 | 37 | 47.625 | 8.5 | |
| 3400 | 680 | 43 | 47 | 48.5 | 15.5 | 3400 | 680 | 37.5 | 37.5 | 48.5 | 8.5 | |
| 3500 | 700 | 43.75 | 47.75 | 49.375 | 15.625 | 3500 | 700 | 38 | 38 | 49.375 | 8.625 | |
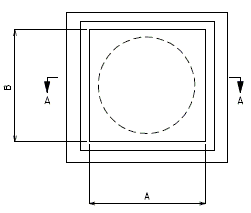 |
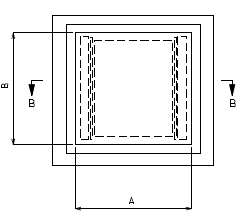
| |
| Fixed Bearing | Expansion Bearing | |
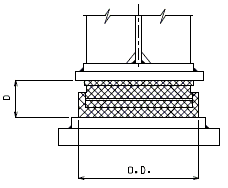 |
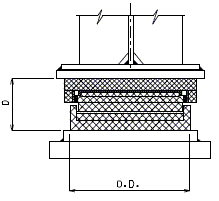
| |
| Section A-A | Section B-B | |
| Fixed Bearing | Expansion Bearing |
751.11.3 Details
751.11.3.1 Elastomeric Bearings for P/S I-Girders
Expansion Bearings
Note: The location of anchor bolts in relation to the slotted holes in the sole plate shall correspond with the temperature at the time of erection. At 60°F the slotted holes should center on the anchor bolts.
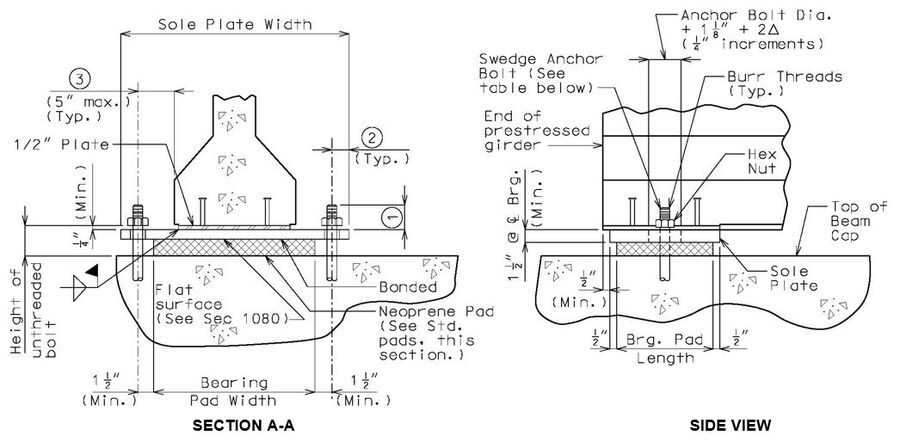
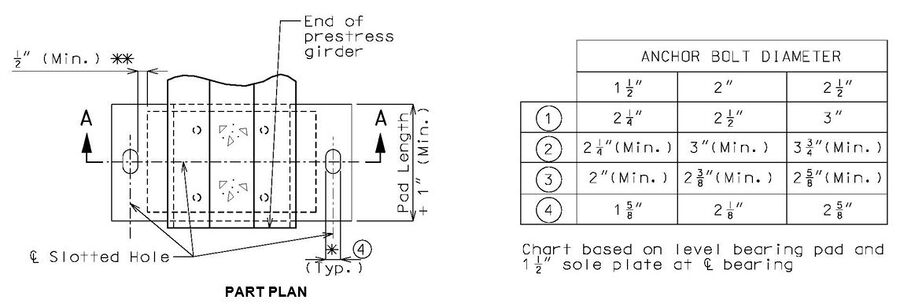
Notes:
For use of smaller or larger diameter anchor bolts than shown in the table “Anchor Bolt Diameter” and with approval of SPM or SLE, see Fabrication Operations Engineer.
Bevel sole plate to match the slope of girder to the nearest 1/8" total difference in thickness across the plate. Minimum thickness shall be 1 1/2" at centerline bearing and 1" at the edge of bearing. (By design)
For > 2 1/2", use PTFE bearings.
* Slot width may be increased on wide roadways to accommodate lateral expansion. See Structural Project Manager.
** Designer should verify that minimum dimensions are met or neoprene will melt and flow into hole during manufacturing of bearings.
751.11.3.2 Elastomeric Bearings for Steel Girders
Laminated Expansion Bearings
Note: The location of anchor bolts in relation to the slotted holes in the sole plate shall correspond with the temperature at the time of erection. At 60°F the slotted holes should center on the anchor bolts.
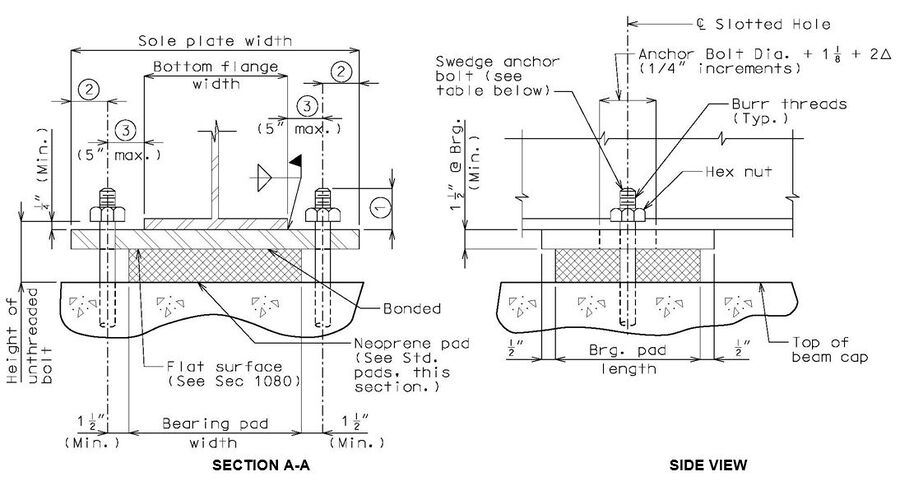
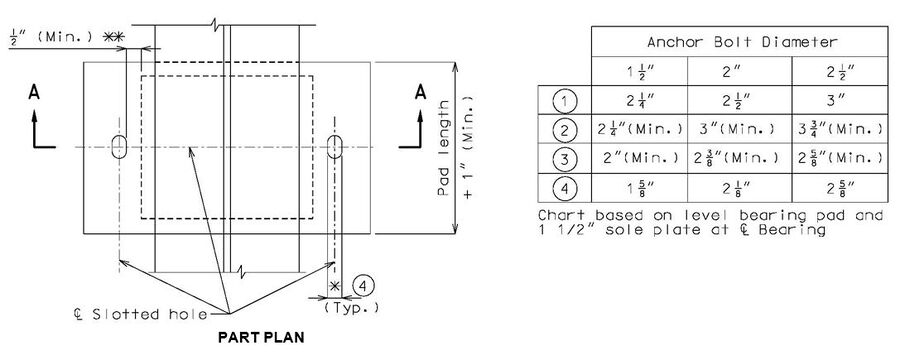
Notes:
For use of smaller or larger diameter anchor bolts than shown in the table “Anchor Bolt Diameter” and with approval of SPM or SLE, see Fabrication Operations Engineer.
Bevel sole plate to match the slope of girder to the nearest 1/8" total difference in thickness across the plate. Minimum thickness shall be 1 1/2" at centerline bearing and 1" at the edge of bearing. (by design)
For > 2 1/2", use PTFE bearings.
* Slot width may be increased on wide roadways to accommodate lateral expansion. See Structural Project Manager.
** Designer should verify that minimum dimensions are met or neoprene will melt and flow into hole during manufacturing of bearings.
Laminated Fixed Bearing
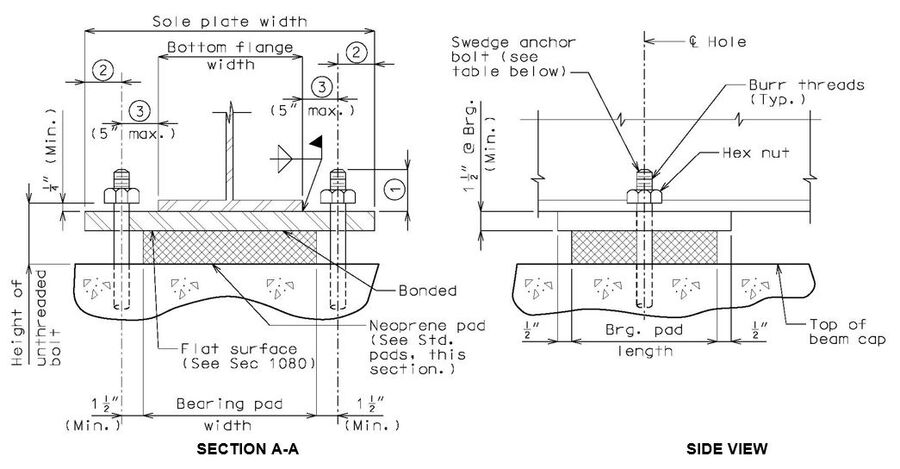
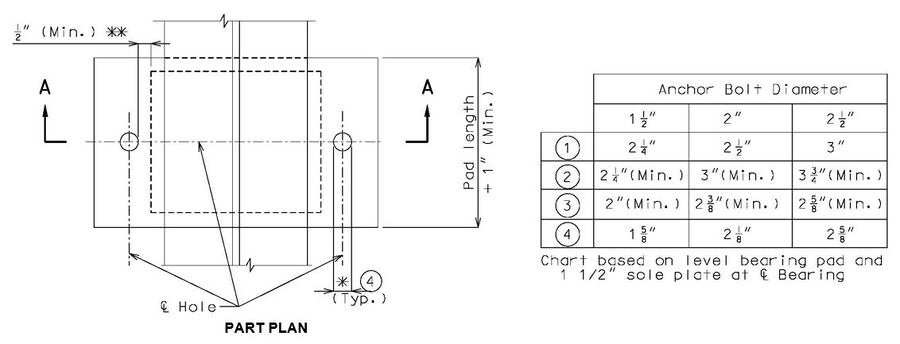
Notes:
For use of smaller or larger diameter anchor bolts than shown in the table “Anchor Bolt Diameter” and with approval of SPM or SLE, see Fabrication Operations Engineer.
Bevel sole plate to match the slope of girder to the nearest 1/8" total difference in thickness across the plate. Minimum thickness shall be 1 1/2" at centerline bearing and 1" at the edge of bearing. (by design)
* Slot width may be increased on wide roadways to accommodate lateral expansion. See Structural Project Manager.
** Design should verify that minimum dimensions are met or neoprene will melt and flow into hole during manufacturing of bearings.
Sole Plate Clipping Details
(for Steel Structures)
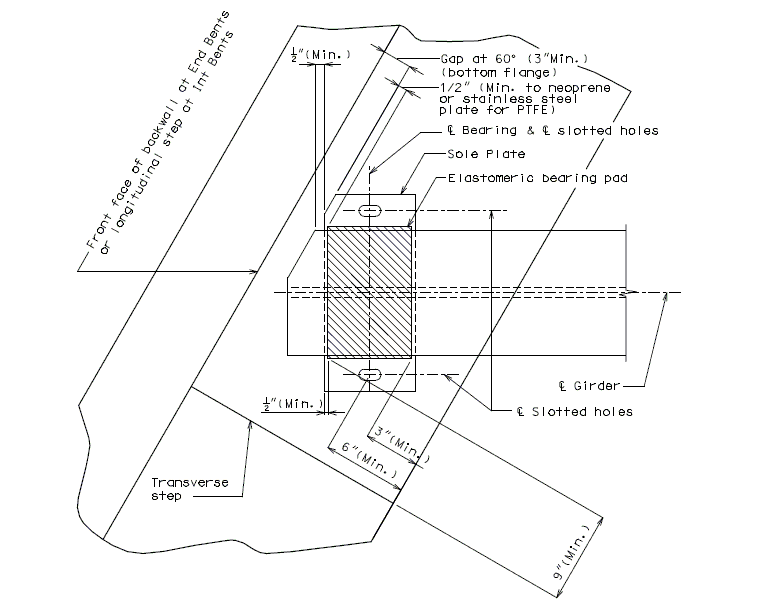 SECTION THRU BEARING
Minimum edge distance shall be maintained on all holes in sole plate. Slotted holes shown are for expansion bearings.
751.11.3.3 PTFE Bearings
Note: The location of anchor bolts in relation to the slotted holes in the sole plate shall correspond with the temperature at the time of erection. At 60°F the slotted holes should center on the anchor bolts.
 | |||
| SECTION A-A | SIDE VIEW | ||
|---|---|---|---|
 | |||
| PART PLAN VIEW | |||
Notes:
For use of smaller or larger diameter anchor bolts than shown in the table “Anchor Bolt Diameter” and with approval of SPM or SLE, see Fabrication Operations Engineer.
* Slot width may be increased on wide roadways to accommodate lateral expansion. See Structural Project Manager.
**** Designer should verify that minimum dimensions are met or neoprene will melt and flow into the hole during manufacturing of bearing.
Either stopper plates, or both stopper plates and straps shall be used to restrain potential longitudinal, or longitudinal and transverse pad movement, respectively.
If anchor bolts are believed to be insufficient in restraining pad transverse movement, straps shall be used if the maximum distance between the anchor bolt and edge of girder is not exceeded. If straps are not required, or do not fit without exceeding this distance, stopper plates shall still be used and without recessed ends.
Details of the sole plate connection to the prestress girder.
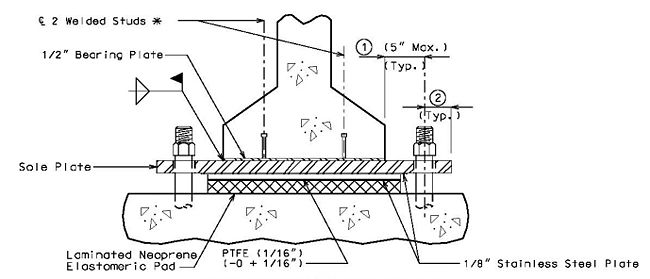

SECTION THRU GIRDER

SECTION AT END OF GIRDER
751.11.3.4 Bearing Edge Distance
Steel or Prestress Girders
Beam Ledges
Heavy loads placed near the edge of a concrete surface can produce spalling. Two precautions should be taken to avoid the problem. Additional reinforcement should be placed under the load and around the corner. The bearing area of the load should not project beyond the straight portion of the stirrups, nor beyond the interior face of a transverse anchor bar (if one is provided). The recommended distance to a step, or the end of the bent cap in the transverse direction is 9 inches.
Provide minimum support length in accordance with Bridge Seismic Design Flowchart.
Bearing Clearance
When beams are placed to end at an intermediate bent, the clearance is governed by the bent up strands, diaphragm reinforcement, skew, and any vertical or horizontal curvature in the profile grade. A 9 inch minimum between bearing pads for prestressed girders is a general rule. For simply supported steel or constant depth girders the recommended minimum clearance is 2 inches between bearing pads. See Dimension "C". Also consider transverse girder offsets when using prestressed girders on horizontally curved alignments.
Check that all anchor bolts are located inside stirrup reinforcement.
Beam Steps
| DIFFERENCE IN BEARING ELEV. | METHOD OF OBTAINING ELEVATION |
| 1/8" or less | Retain in vertical dimension but use no fill plates
Use the lower 1/8" for bent height. |
| 1/4" thru 1/2" | Increase thickness of top plate of bearing or haunch. |
| 5/8" thru 1" and up* | Monolithic bearing pad or step beam. |
* Use same method of obtaining elevaton throughout a structure where practical. Do not mix monolithic bearing pads and steps.
STEP BEAM
MONOLITHIC BEARING PADS
751.11.3.5 Anchor Bolts
Show anchor bolt well locations and details on the plans.
Only removable forming material is required for forming anchor bolt wells in accordance with Sec 712 and as determined by the contractor which could include PVC, styrofoam, carboard, etc. In lieu of anchor bolts wells, anchor bolts holes may be drilled when permitted in the field as a contractor option, or where required which shall be noted on the plans.
Drilling anchor bolt holes should not be permitted in the field or made required on the plans unless reinforcement is detailed on plans to clear anchor bolt wells. An example of drilling needing to be required on the plans would be rehabilitations involving existing bent caps.
If uplift is a concern, determine capacity of anchorage based upon strength developed utilizing either well or drilled hole. Use engineering judgment in determining capacity of either system, i.e. friction capacity, grout capacity, anchor capacity. Identify specific method of anchoring required if there is a concern about differences in resistance capacity.
Clearance for reinforcement:
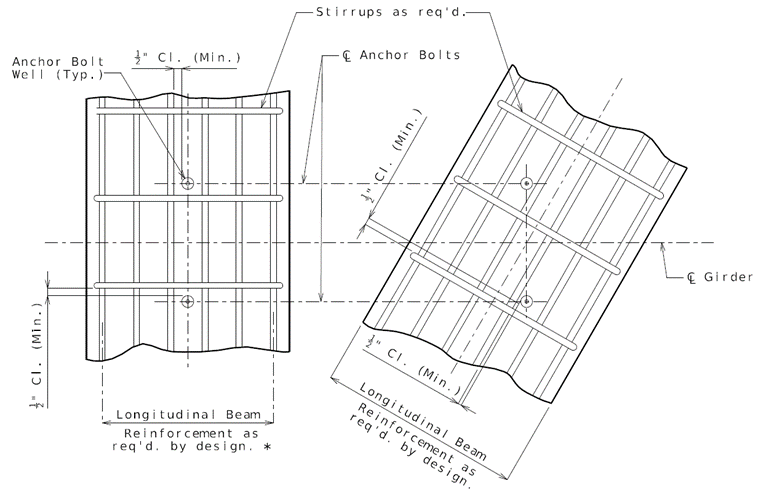 | |||
| SQUARE | SKEWED | ||
|---|---|---|---|
PART PLAN OF BEAM TOPS
* Use even number of bars in beam tops for square bridges when possible.
Note: Details shown above are for information only. Place the following note on the plans, preferably with "General Notes."
"All reinforcing bars in the tops of substructure beams or caps shall be spaced to clear anchor bolt wells for bearings by at least 1/2"."
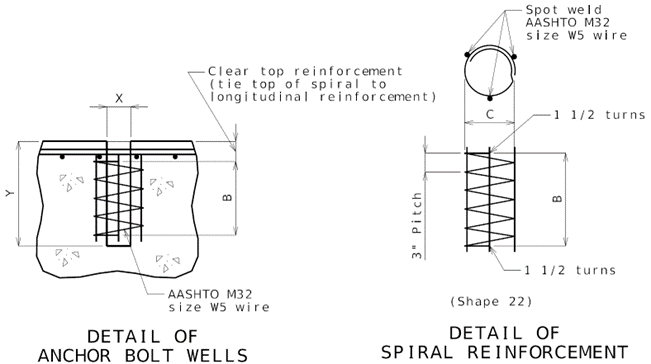
| TABLE OF ANCHOR BOLT WELLS | |||||||
|---|---|---|---|---|---|---|---|
| Anchor Bolt Diameter | Well Diameter X | Well Depth Y | Spiral Depth B | Spiral Diameter C | W5 Nominal Length | W5 Actual Length | Bolt Extension into Concrete |
| 1" | 3" | 12" | 9" | 8" | 14'-10" | 14-'6" | 9" |
| 1 1/4" | 4" | 15" | 12" | 9" | 19’-7" | 19'-1" | 12" |
| 1 1/2" | 4" | 18" | 15" | 9" | 22'-8" | 22'-2" | 15" |
| 2" | 4" | 21" | 18" | 9" | 25'-9" | 25'-2" | 18" |
| 2 1/2" | 4" | 28" | 25" | 9" | 33'-1" | 32'-4" | 25" |
Nominal length is based on out-to-out dimension. Actual length is the measured along the centerline of the W5 wire. Both nominal length and actual length includes the length of the three side wires.
Omit spiral on 21" WF if anchor bolt spacing is less than 6".
| TABLE OF BOLT WEIGHTS | |||||||
|---|---|---|---|---|---|---|---|
| Description | 1" | 1 1/4" | 1 1/2" | 2" | 2 1/2" | ||
| Unthreaded (#/in.) | ---- | ---- | 0.5 | 0.89 | 1.39 | ||
| Threaded (#/in.) | ---- | ---- | 0.425 | 0.755 | 1.20 | ||
| Nut (lbs.) | ---- | ---- | 1.31 | 2.99 | 5.64 | ||
| Weight used for entire bearing (#/ft.) | 2.673 | 4.175 | ---- | ---- | ---- | ||
Epoxy coat anchor bolt wells at bents with expansion devices.
SWEDGE ANCHOR BOLT DETAILS
| Bridge Standard Drawings |
| Bearings - BRG |
751.11.3.6 Girder/Beam Chairs
General
Chairs shall be used at integral bents for prestressed and steel girders and beams if slope requirements cannot be met by elastomeric laminated fixed bearings. Chairs shall also be used for prestressed girders and beams at fixed intermediate bents where minimum dead load or slope requirements cannot be met by elastomeric laminated fixed bearings and under the smaller girder where girder sizes change.
The following detail is not required on the plan sheets but illustrates the location of the bearing with respect to the 7-inch plate. See EPG 751.22.3.7.4 for how chairs are shown on the plan of beam.

PLAN OF CHAIR (Skewed bent)
Chair Details
The following details shall be provided on the appropriate bent plan sheets. The beams steps and the construction key are shown to illustrate minimum distances, but these items are not required in these details on the plan sheets. Prestressed I girder shown, all other girders and beams are similar.

GIRDER CHAIR DETAILS
Detailing Guidance: See EPG 751.50 (Notes A4a3.1 and G1.16 thru G1.19) for appropriate notes to be placed with details. Green items are guidance and shall not be shown on plans. (a) 3" minimum to beam steps, 9" minimum to end of beam. (b) 1/2" minimum and 5" maximum. Use beam step if necessary. With a change in girder size, use thicker laminated pads on the tall girder side if necessary. (c) These dimensions are based on a 17-inch bottom flange, revise accordingly for other widths. (d) 3" minimum for steel girders and beams. 5" minimum for prestressed I girders and bulb-tee girders. 3½" minimum for prestressed NU girders.
Maximum Service Limit State Load Reaction
The maximum service load reaction for the details shown shall be 90 kips.
This limit is based on ASTM A709 Grade 36 steel and bolt pattern shown with bolt threads in the shear plane.
Larger service load reactions will require modified details by design.
When determining service limit state load reaction use DC Loading (excluding barrier or railing) and an additional 50 lb/sf construction load.
Possible Variations to Aid in Rebar Placement
The following variations of the above details shall be discussed with the Structural Project Manager or Structural Liaison Engineer if required to reduce conflict between the vertical angels and the beam reinforcement.
The gap and length of plate is variable and dependent on what is required for rebar placement. The details of the ends of closed concrete intermediate diaphragms will need to be modified from the details shown in EPG 751.22.3.7 Closed Concrete Intermediate Diaphragms.

